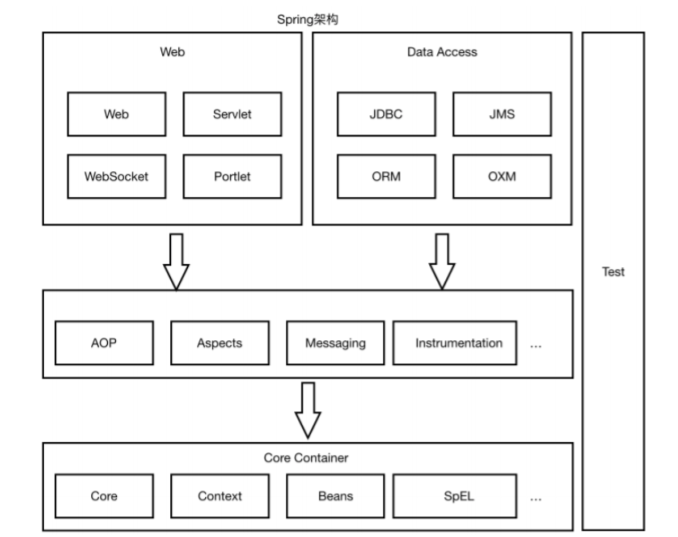
Spring MVC 源码剖析
Spring MVC 是Spring 给我们提供的一个用于简化Web开发的框架
主要课程内容
- Spring MVC 应用(常规使用)
- Spring MVC 高级技术(拦截器、异常处理器等)
- 手写MVC 框架(自定义MVC框架。难点、重点)
- Spring MVC 源码深度剖析(难点、重点)
- SSM整合
第一部分 Spring MVC 应用
第1节 Spring MVC 简介
1.1 MVC 体系结构
三层架构
我们的开发架构一般都是基于两种形式,一种是C/S架构,也就是客户端/服务端;另一种是B/S架构,也就是浏览器/服务器。在JavaEE开发中,几乎全部都是基于B/S架构的开发。那么在B/S架构中,系统标准的三层架构包括:表现层、业务层、持久层。三层架构在我们的实际开发中使用的非常多,所以我们的课程中的案例也都是基于三层架构设计的。
三层架构中, 每一层各司其职,接下来我们说说每层都是负责哪些方面:
表现层:
也就是我们常说的web层。它负责客户端请求,向客户端响应结果,通常客户端使用http协议请求web层,web需要接收http请求,完成http响应。
表现层包括展示层和控制层:控制层负责接收请求,展示层负责结果的展示。
表现层依赖业务层,接收到客户端请求一般会调用业务层进行业务处理,并将处理结果响应给客户端。
表现层的设计一般都是使用MVC模型,(MVC是表现层的设计模型,和其他层没有关系)
业务层:
也就是我们常说的service层。它负责业务逻辑处理,和我们开发项目的需求息息相关。web层依赖业务层,但是业务层不依赖web层。
业务层在业务处理时可能会依赖持久层,如果要对数据持久化需要保证事务一致性。(也就是我们说的,事务应该放到业务层来控制)
持久层:
也就是我们是常说的dao层。负责数据持久化,包括数据层即数据库和数据访问层,数据库是对数据进行持久化的载体,数据访问层是业务层和持久层交互的接口,业务层需要通过数据访问层将数据持久化到数据库中,通俗的讲,持久层就是和数据库交互,对数据库表进行增删改查的。
MVC 设计模式
MVC全名是Model View Controller, 是模型(model)- 视图(view)- 控制器(controller)的缩写, 是一种用于设计创建web应用程序表现层的模式。MVC中每个部分各司其职:
- Model(模型):模型包含业务模型和数据模型,数据模型用于封装数据,业务模型用于处理业务。
- View(视图):通常指的就是我们的jsp或者html. 作用一般就是展示数据的,通常视图是依据模型数据创建的。
- Controller(控制器):是应用程序中处理用户交互的部分,作用一般就是处理程序逻辑的。
MVC 提倡:每一层只编写自己的东西,不编写任何其他层的代码;分层是为了解耦,解耦是为了维护方便合分工协作。
1.2 Spring MVC 是什么?
Spring MVC 的全名叫 Spring Web MVC, 是一种基于Java的实现MVC设计模型的请求驱动类型的轻量级Web框架,属于SpringFrameWork的后续产品。
SpringMVC 已经成为目前最主流的MVC框架之一,并且随着Spring3.0的发布,全面超越Struts2,成为最优秀的MVC框架。
servlet、struts实现接⼝、springmvc中要让⼀个java类能够处理请求只需要添加注解就ok
它通过⼀套注解,让⼀个简单的 Java 类成为处理请求的控制器,⽽⽆须实现任何接⼝。同时它还⽀持 RESTful 编程⻛格的请求。
总之:Spring MVC和Struts2⼀样,都是 为了解决表现层问题 的web框架,它们都是基于 MVC 设计模 式的。⽽这些表现层框架的主要职责就是处理前端HTTP请求。
Spring MVC 本质可以认为是对servlet的封装,简化了我们serlvet的开发 作⽤:1)接收请求 2)返回响应,跳转⻚⾯

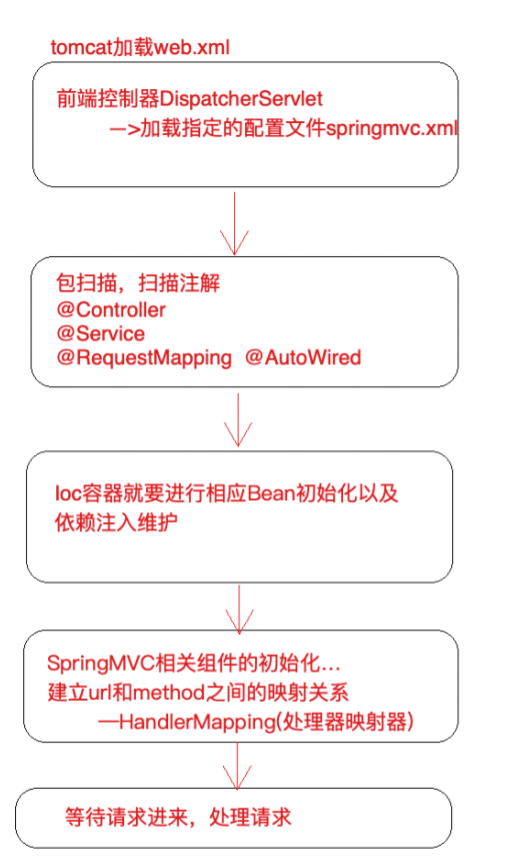
第 2 节 Spring Web MVC ⼯作流程
需求:前端浏览器请求url:http://localhost:8080/demo/handle01,前端⻚⾯显示后台服务器的时间 开发过程
1)配置DispatcherServlet前端控制器
2)开发处理具体业务逻辑的Handler(@Controller、@RequestMapping)
3)xml配置⽂件配置controller扫描,配置springmvc三⼤件
4)将xml⽂件路径告诉springmvc(DispatcherServlet)
2.1 Spring MVC 请求处理流程
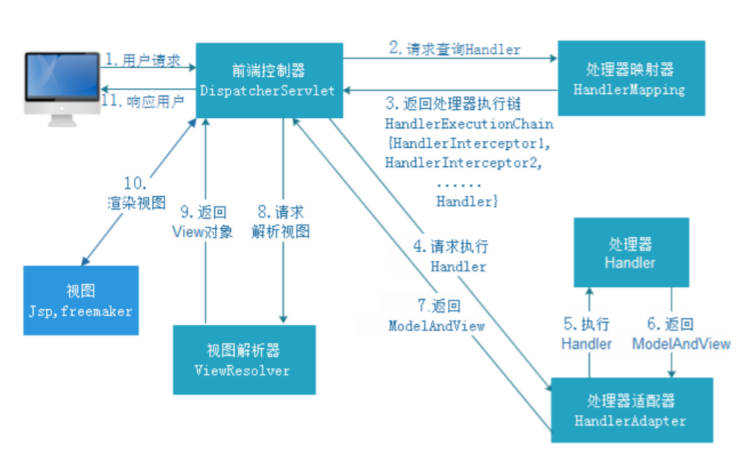
流程说明
第⼀步:⽤户发送请求⾄前端控制器DispatcherServlet
第⼆步:DispatcherServlet收到请求调⽤HandlerMapping处理器映射器
第三步:处理器映射器根据请求Url找到具体的Handler(后端控制器),⽣成处理器对象及处理器拦截 器(如果 有则⽣成)⼀并返回DispatcherServlet
第四步:DispatcherServlet调⽤HandlerAdapter处理器适配器去调⽤Handler
第五步:处理器适配器执⾏Handler
第六步:Handler执⾏完成给处理器适配器返回ModelAndView
第七步:处理器适配器向前端控制器返回 ModelAndView,ModelAndView 是SpringMVC 框架的⼀个 底层对 象,包括 Model 和 View
第⼋步:前端控制器请求视图解析器去进⾏视图解析,根据逻辑视图名来解析真正的视图。
第九步:视图解析器向前端控制器返回View
第⼗步:前端控制器进⾏视图渲染,就是将模型数据(在 ModelAndView 对象中)填充到 request 域
第⼗⼀步:前端控制器向⽤户响应结果
2.2 Spring MVC 九⼤组件
HandlerMapping(处理器映射器)
HandlerMapping 是⽤来查找 Handler 的,也就是处理器,具体的表现形式可以是类,也可以是 ⽅法。⽐如,标注了@RequestMapping的每个⽅法都可以看成是⼀个Handler。Handler负责具 体实际的请求处理,在请求到达后,HandlerMapping 的作⽤便是找到请求相应的处理器 Handler 和 Interceptor.
HandlerAdapter(处理器适配器)
HandlerAdapter 是⼀个适配器。因为 Spring MVC 中 Handler 可以是任意形式的,只要能处理请 求即可。但是把请求交给 Servlet 的时候,由于 Servlet 的⽅法结构都是 doService(HttpServletRequest req,HttpServletResponse resp)形式的,要让固定的 Servlet 处理 ⽅法调⽤ Handler 来进⾏处理,便是 HandlerAdapter 的职责。
HandlerExceptionResolver
HandlerExceptionResolver ⽤于处理 Handler 产⽣的异常情况。它的作⽤是根据异常设置 ModelAndView,之后交给渲染⽅法进⾏渲染,渲染⽅法会将 ModelAndView 渲染成⻚⾯。
ViewResolver
ViewResolver即视图解析器,⽤于将String类型的视图名和Locale解析为View类型的视图,只有⼀ 个resolveViewName()⽅法。从⽅法的定义可以看出,Controller层返回的String类型视图名 viewName 最终会在这⾥被解析成为View。View是⽤来渲染⻚⾯的,也就是说,它会将程序返回 的参数和数据填⼊模板中,⽣成html⽂件。ViewResolver 在这个过程主要完成两件事情: ViewResolver 找到渲染所⽤的模板(第⼀件⼤事)和所⽤的技术(第⼆件⼤事,其实也就是找到 视图的类型,如JSP)并填⼊参数。默认情况下,Spring MVC会⾃动为我们配置⼀个 InternalResourceViewResolver,是针对 JSP 类型视图的。
RequestToViewNameTranslator
RequestToViewNameTranslator 组件的作⽤是从请求中获取 ViewName.因为 ViewResolver 根据 ViewName 查找 View,但有的 Handler 处理完成之后,没有设置 View,也没有设置 ViewName, 便要通过这个组件从请求中查找 ViewName。
LocaleResolver
ViewResolver 组件的 resolveViewName ⽅法需要两个参数,⼀个是视图名,⼀个是 Locale。 LocaleResolver ⽤于从请求中解析出 Locale,⽐如中国 Locale 是 zh-CN,⽤来表示⼀个区域。这 个组件也是 i18n 的基础。
ThemeResolver
ThemeResolver 组件是⽤来解析主题的。主题是样式、图⽚及它们所形成的显示效果的集合。 Spring MVC 中⼀套主题对应⼀个 properties⽂件,⾥⾯存放着与当前主题相关的所有资源,如图 ⽚、CSS样式等。创建主题⾮常简单,只需准备好资源,然后新建⼀个“主题名.properties”并将资 源设置进去,放在classpath下,之后便可以在⻚⾯中使⽤了。SpringMVC中与主题相关的类有 ThemeResolver、ThemeSource和Theme。ThemeResolver负责从请求中解析出主题名, ThemeSource根据主题名找到具体的主题,其抽象也就是Theme,可以通过Theme来获取主题和 具体的资源。
MultipartResolver
MultipartResolver ⽤于上传请求,通过将普通的请求包装成 MultipartHttpServletRequest 来实 现。MultipartHttpServletRequest 可以通过 getFile() ⽅法 直接获得⽂件。如果上传多个⽂件,还 可以调⽤ getFileMap()⽅法得到Map这样的结构,MultipartResolver 的作⽤就 是封装普通的请求,使其拥有⽂件上传的功能。
FlashMapManager
FlashMap ⽤于重定向时的参数传递,⽐如在处理⽤户订单时候,为了避免重复提交,可以处理完 post请求之后重定向到⼀个get请求,这个get请求可以⽤来显示订单详情之类的信息。这样做虽然 可以规避⽤户重新提交订单的问题,但是在这个⻚⾯上要显示订单的信息,这些数据从哪⾥来获得 呢?因为重定向时么有传递参数这⼀功能的,如果不想把参数写进URL(不推荐),那么就可以通 过FlashMap来传递。只需要在重定向之前将要传递的数据写⼊请求(可以通过ServletRequestAttributes.getRequest()⽅法获得)的属性OUTPUT_FLASH_MAP_ATTRIBUTE 中,这样在重定向之后的Handler中Spring就会⾃动将其设置到Model中,在显示订单信息的⻚⾯ 上就可以直接从Model中获取数据。FlashMapManager 就是⽤来管理 FalshMap 的。
第 3 节 请求参数绑定(串讲)
请求参数绑定:说⽩了SpringMVC如何接收请求参数
http协议(超⽂本传输协议)
原⽣servlet接收⼀个整型参数:
1)String ageStr = request.getParameter("age");
2) Integer age = Integer.parseInt(ageStr);
SpringMVC框架对Servlet的封装,简化了servlet的很多操作
SpringMVC在接收整型参数的时候,直接在Handler⽅法中声明形参即可
@RequestMapping("xxx")
public String handle(Integer age) {
    System.out.println(age);
}
参数绑定:取出参数值绑定到handler⽅法的形参上
默认⽀持 Servlet API 作为⽅法参数
当需要使⽤HttpServletRequest、HttpServletResponse、HttpSession等原⽣servlet对象时,直 接在handler⽅法中形参声明使⽤即可。
/**
 *
 * SpringMVC 对原⽣servlet api的⽀持 url:/demo/handle02?id=1
 *
 * 如果要在SpringMVC中使⽤servlet原⽣对象,⽐如
HttpServletRequest\HttpServletResponse\HttpSession,直接在Handler⽅法形参中声
明使⽤即可
 *
 */
@RequestMapping("/handle02")
public ModelAndView handle02(HttpServletRequest request,
                             HttpServletResponse response,HttpSession session) {
    String id = request.getParameter("id");
    Date date = new Date();
    ModelAndView modelAndView = new ModelAndView();
    modelAndView.addObject("date",date);
    modelAndView.setViewName("success");
    return modelAndView;
}
绑定简单类型参数
简单数据类型:⼋种基本数据类型及其包装类型
参数类型推荐使⽤包装数据类型,因为基础数据类型不可以为null
整型:Integer、int
字符串:String
单精度:Float、float
双精度:Double、double
布尔型:Boolean、boolean
说明:对于布尔类型的参数,请求的参数值为true或false。或者1或0
注意:绑定简单数据类型参数,只需要直接声明形参即可(形参参数名和传递的参数名要保持⼀ 致,建议 使⽤包装类型,当形参参数名和传递参数名不⼀致时可以使⽤@RequestParam注解进⾏ ⼿动映射)
/*
 * SpringMVC 接收简单数据类型参数 url:/demo/handle03?id=1
 *
 * 注意:接收简单数据类型参数,直接在handler⽅法的形参中声明即可,框架会取出参数值
然后绑定到对应参数上
 * 要求:传递的参数名和声明的形参名称保持⼀致
 */
@RequestMapping("/handle03")
public ModelAndView handle03(@RequestParam("ids") Integer id,Boolean
                             flag) {
    Date date = new Date();
    ModelAndView modelAndView = new ModelAndView();
    modelAndView.addObject("date",date);
    modelAndView.setViewName("success");
    return modelAndView;
}
绑定Pojo类型参数
/*
 * SpringMVC接收pojo类型参数 url:/demo/handle04?id=1&username=zhangsan
 *
 * 接收pojo类型参数,直接形参声明即可,类型就是Pojo的类型,形参名⽆所谓
 * 但是要求传递的参数名必须和Pojo的属性名保持⼀致
 */
@RequestMapping("/handle04")
public ModelAndView handle04(User user) {
    Date date = new Date();
    ModelAndView modelAndView = new ModelAndView();
    modelAndView.addObject("date",date);
    modelAndView.setViewName("success");
    return modelAndView;
}
绑定Pojo包装对象参数
包装类型 QueryVo
package com.lagou.edu.pojo;
/**
* @author 应癫
*/
public class QueryVo {
    private String mail;
    private String phone;
    // 嵌套了另外的Pojo对象
    private User user;
    public String getMail() {
        return mail;
    }
    public void setMail(String mail) {
        this.mail = mail;
    }
    public String getPhone() {
        return phone;
    }
    public void setPhone(String phone) {
        this.phone = phone;
    }
    public User getUser() {
        return user;
    }
    public void setUser(User user) {
        this.user = user;
    }
}
Handler⽅法
/*
 * SpringMVC接收pojo包装类型参数 url:/demo/handle05?
user.id=1&user.username=zhangsan
 * 不管包装Pojo与否,它⾸先是⼀个pojo,那么就可以按照上述pojo的要求来
 * 1、绑定时候直接形参声明即可
 * 2、传参参数名和pojo属性保持⼀致,如果不能够定位数据项,那么通过属性名 + "." 的
⽅式进⼀步锁定数据
 *
 */
@RequestMapping("/handle05")
public ModelAndView handle05(QueryVo queryVo) {
    Date date = new Date();
    ModelAndView modelAndView = new ModelAndView();
    modelAndView.addObject("date",date);
    modelAndView.setViewName("success");
    return modelAndView;
}
绑定⽇期类型参数(需要配置⾃定义类型转换器)
前端jsp
<fieldset>
    <p>测试⽤例:SpringMVC接收⽇期类型参数</p>
    <a href="/demo/handle06?birthday=2019-10-08">点击测试</a>
</fieldset>
后台Handler⽅法
/**
 * 绑定⽇期类型参数
 * 定义⼀个SpringMVC的类型转换器 接⼝,扩展实现接⼝接⼝,注册你的实现
 * @param birthday
 * @return
 */
@RequestMapping("/handle06")
public ModelAndView handle06(Date birthday) {
    Date date = new Date();ModelAndView modelAndView = new
        ModelAndView();
    modelAndView.addObject("date",date);
    modelAndView.setViewName("success");
    return modelAndView;
}
⾃定义类型转换器
package com.lagou.edu.converter;
import org.springframework.core.convert.converter.Converter;
import java.text.ParseException;
import java.text.SimpleDateFormat;
import java.util.Date;
/**
* @author 应癫
* ⾃定义类型转换器
* S:source,源类型
* T:target:⽬标类型
*/
public class DateConverter implements Converter<String, Date> {
    @Override
    public Date convert(String source) {
        // 完成字符串向⽇期的转换
        SimpleDateFormat simpleDateFormat = new
            SimpleDateFormat("yyyy-MM-dd");
        try {
            Date parse = simpleDateFormat.parse(source);
            return parse;
        } catch (ParseException e) {
            e.printStackTrace();
        }
        return null;
    }
}
注册⾃定义类型转换器
<!--⾃动注册最合适的处理器映射器,处理器适配器(调⽤handler⽅法)-->
<mvc:annotation-driven conversionservice="conversionServiceBean"/>
<!--注册⾃定义类型转换器-->
<bean id="conversionServiceBean"
    class="org.springframework.format.support.FormattingConversionServiceF
           actoryBean">
  <property name="converters">
      <set>
          <bean class="com.lagou.edu.converter.DateConverter">
          </bean>
      </set>
  </property>
</bean>
第 4 节 对 Restful ⻛格请求⽀持
rest⻛格请求是什么样的?
springmvc对rest⻛格请求到底提供了怎样的⽀持
- 是⼀个注解的使⽤@PathVariable,可以帮助我们从uri中取出参数
4.1 什么是 RESTful
Restful 是⼀种 web 软件架构⻛格,它不是标准也不是协议,它倡导的是⼀个资源定位及资源操作的⻛ 格。
什么是 REST:
REST(英⽂:Representational State Transfer,简称 REST)描述了⼀个架构样式的⽹络系统, ⽐如 web 应⽤程序。它⾸次出现在 2000 年 Roy Fielding 的博⼠论⽂中,他是 HTTP 规范的主要编写者之 ⼀。在⽬前主流的三种 Web 服务交互⽅案中,REST 相⽐于 SOAP(Simple Object Access protocol, 简单对象访问协议)以及 XML-RPC 更加简单明了,⽆论是对 URL 的处理还是对 Payload 的编码, REST 都倾向于⽤更加简单轻量的⽅法设计和实现。值得注意的是 REST 并没有⼀个明确的标准,⽽更像 是⼀种设计的⻛格。
它本身并没有什么实⽤性,其核⼼价值在于如何设计出符合 REST ⻛格的⽹络接⼝。
资源 表现层 状态转移
Restful 的优点
它结构清晰、符合标准、易于理解、扩展⽅便,所以正得到越来越多⽹站的采⽤。
Restful 的特性
资源(Resources):⽹络上的⼀个实体,或者说是⽹络上的⼀个具体信息。
它可以是⼀段⽂本、⼀张图⽚、⼀⾸歌曲、⼀种服务,总之就是⼀个具体的存在。可以⽤⼀个 URI(统 ⼀资源定位符)指向它,每种资源对应⼀个特定的 URI 。要获取这个资源,访问它的 URI 就可以,因此 URI 即为每⼀个资源的独⼀⽆⼆的识别符。
表现层(Representation):把资源具体呈现出来的形式,叫做它的表现层 (Representation)。⽐ 如,⽂本可以⽤ txt 格式表现,也可以⽤ HTML 格式、XML 格式、JSON 格式表现,甚⾄可以采⽤⼆进 制格式。
状态转化(State Transfer):每发出⼀个请求,就代表了客户端和服务器的⼀次交互过程。
HTTP 协议,是⼀个⽆状态协议,即所有的状态都保存在服务器端。因此,如果客户端想要操作服务 器, 必须通过某种⼿段,让服务器端发⽣“状态转化”(State Transfer)。⽽这种转化是建⽴在表现层 之上的,所以就是 “ 表现层状态转化” 。具体说, 就是 HTTP 协议⾥⾯,四个表示操作⽅式的动词: GET 、POST 、PUT 、DELETE 。它们分别对应四种基本操作:GET ⽤来获取资源,POST ⽤来新建资 源,PUT ⽤来更新资源,DELETE ⽤来删除资源。
RESTful 的示例:
rest是⼀个url请求的⻛格,基于这种⻛格设计请求的url
没有rest的话,原有的url设计
http://localhost:8080/user/queryUserById.action?id=3
url中定义了动作(操作),参数具体锁定到操作的是谁
有了rest⻛格之后
rest中,认为互联⽹中的所有东⻄都是资源,既然是资源就会有⼀个唯⼀的uri标识它,代表它
代表的是id为3的那个⽤户记录(资源)
锁定资源之后如何操作它呢?常规操作就是增删改查
根据请求⽅式不同,代表要做不同的操作
get 查询,获取资源
post 增加,新建资源
put 更新
delete 删除资源
rest⻛格带来的直观体现:就是传递参数⽅式的变化,参数可以在uri中了
/account/1 HTTP GET :得到 id = 1 的 account
/account/1 HTTP DELETE:删除 id = 1 的 account
/account/1 HTTP PUT:更新 id = 1 的 account
URL:资源定位符,通过URL地址去定位互联⽹中的资源(抽象的概念,⽐如图⽚、视频、app服务 等)。
RESTful ⻛格 URL:互联⽹所有的事物都是资源,要求URL中只有表示资源的名称,没有动词。
RESTful⻛格资源操作:使⽤HTTP请求中的method⽅法put、delete、post、get来操作资源。分别对 应添加、删除、修改、查询。不过⼀般使⽤时还是 post 和 get。put 和 delete⼏乎不使⽤。
RESTful ⻛格资源表述:可以根据需求对URL定位的资源返回不同的表述(也就是返回数据类型,⽐如 XML、JSON等数据格式)。
Spring MVC ⽀持 RESTful ⻛格请求,具体讲的就是使⽤ @PathVariable 注解获取 RESTful ⻛格的请求 URL中的路径变量。
示例代码:
- 前端jsp⻚⾯
<div>
    <h2>SpringMVC对Restful⻛格url的⽀持</h2>
    <fieldset>
        <p>测试⽤例:SpringMVC对Restful⻛格url的⽀持</p>
        <a href="/demo/handle/15">rest_get测试</a>
        <form method="post" action="/demo/handle">
            <input type="text" name="username"/>
            <input type="submit" value="提交rest_post请求"/>
        </form>
        <form method="post" action="/demo/handle/15/lisi">
            <input type="hidden" name="_method" value="put"/>
            <input type="submit" value="提交rest_put请求"/>
        </form>
        <form method="post" action="/demo/handle/15">
            <input type="hidden" name="_method" value="delete"/>
            <input type="submit" value="提交rest_delete请求"/>
        </form>
    </fieldset>
</div>
- 后台Handler⽅法
/*
 * restful get /demo/handle/15
 */
@RequestMapping(value = "/handle/{id}",method =
                {RequestMethod.GET})
public ModelAndView handleGet(@PathVariable("id") Integer id) {
    Date date = new Date();
    ModelAndView modelAndView = new ModelAndView();
    modelAndView.addObject("date",date);
    modelAndView.setViewName("success");
    return modelAndView;
}
/*
 * restful post /demo/handle
 */
@RequestMapping(value = "/handle",method = {RequestMethod.POST})
public ModelAndView handlePost(String username) {
    Date date = new Date();
    ModelAndView modelAndView = new ModelAndView();
    modelAndView.addObject("date",date);
    modelAndView.setViewName("success");
    return modelAndView;
}
/*
 * restful put /demo/handle/15/lisi
 */
@RequestMapping(value = "/handle/{id}/{name}",method =
                {RequestMethod.PUT})
public ModelAndView handlePut(@PathVariable("id") Integer
                              id,@PathVariable("name") String username) {
    Date date = new Date();
    ModelAndView modelAndView = new ModelAndView();
    modelAndView.addObject("date",date);
    modelAndView.setViewName("success");
    return modelAndView;
}
/*
 * restful delete /demo/handle/15
 */
@RequestMapping(value = "/handle/{id}",method =
                {RequestMethod.DELETE})
public ModelAndView handleDelete(@PathVariable("id") Integer id) {
    Date date = new Date();
    ModelAndView modelAndView = new ModelAndView();
    modelAndView.addObject("date",date);
    modelAndView.setViewName("success");
    return modelAndView;
}
- web.xml中配置请求⽅式过滤器(将特定的post请求转换为put和delete请求)
<!--配置springmvc请求⽅式转换过滤器,会检查请求参数中是否有_method参数,如果有就
按照指定的请求⽅式进⾏转换-->
<filter>
    <filter-name>hiddenHttpMethodFilter</filter-name>
    <filterclass>org.springframework.web.filter.HiddenHttpMethodFilter</filterclass>
</filter>
<filter-mapping>
    <filter-name>encoding</filter-name>
    <url-pattern>/*</url-pattern>
</filter-mapping>
<filter-mapping>
    <filter-name>hiddenHttpMethodFilter</filter-name>
    <url-pattern>/*</url-pattern>
</filter-mapping>
第 5 节 Ajax Json交互
交互:两个⽅向
1)前端到后台:前端ajax发送json格式字符串,后台直接接收为pojo参数,使⽤注解@RequstBody
2)后台到前端:后台直接返回pojo对象,前端直接接收为json对象或者字符串,使⽤注解 @ResponseBody
5.1 什么是 Json
Json是⼀种与语⾔⽆关的数据交互格式,就是⼀种字符串,只是⽤特殊符号{}内表示对象、[]内表示数 组、""内是属性或值、:表示后者是前者的值
{"name": "Michael"}可以理解为是⼀个包含name为Michael的对象
[{"name": "Michael"},{"name": "Jerry"}]就表示包含两个对象的数组
5.2 @ResponseBody注解
@responseBody注解的作⽤是将controller的⽅法返回的对象通过适当的转换器转换为指定的格式之 后,写⼊到response对象的body区,通常⽤来返回JSON数据或者是XML数据。 注意:在使⽤此注解之 后不会再⾛视图处理器,⽽是直接将数据写⼊到输⼊流中,他的效果等同于通过response对象输出指定 格式的数据。
5.3 分析Spring MVC 使⽤ Json 交互
所需jar包
<!--json数据交互所需jar,start-->
<dependency>
    <groupId>com.fasterxml.jackson.core</groupId>
    <artifactId>jackson-core</artifactId>
    <version>2.9.0</version>
</dependency>
<dependency>
    <groupId>com.fasterxml.jackson.core</groupId>
    <artifactId>jackson-databind</artifactId>
    <version>2.9.0</version>
</dependency>
<dependency>
    <groupId>com.fasterxml.jackson.core</groupId>
    <artifactId>jackson-annotations</artifactId>
    <version>2.9.0</version>
</dependency>
<!--json数据交互所需jar,end-->
示例代码:
- 前端jsp⻚⾯及js代码
<div>
    <h2>Ajax json交互</h2>
    <fieldset>
        <input type="button" id="ajaxBtn" value="ajax提交"/>
    </fieldset>
</div>
$(function () {
    $("#ajaxBtn").bind("click",function () {
        // 发送ajax请求
        $.ajax({
            url: '/demo/handle07',
            type: 'POST',
            data: '{"id":"1","name":"李四"}',
            contentType: 'application/json;charset=utf-8',
            dataType: 'json',
            success: function (data) {
                alert(data.name);
            }
        })
    })
})
- 后台Handler⽅法
@RequestMapping("/handle07")
// 添加@ResponseBody之后,不再⾛视图解析器那个流程,⽽是等同于response直接输出
数据
    public @ResponseBody User handle07(@RequestBody User user) {
    // 业务逻辑处理,修改name为张三丰
    user.setName("张三丰");
    return user;
}
第⼆部分 Spring MVC ⾼级技术
第 1 节 拦截器(Inteceptor)使⽤
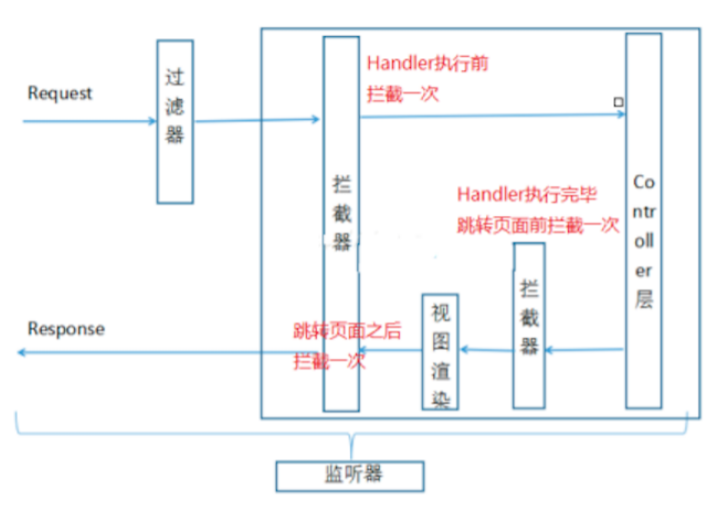
1.1 监听器、过滤器和拦截器对⽐
Servlet:处理Request请求和Response响应
过滤器(Filter):对Request请求起到过滤的作⽤,作⽤在Servlet之前,如果配置为/*可以对所 有的资源访问(servlet、js/css静态资源等)进⾏过滤处理
监听器(Listener):实现了javax.servlet.ServletContextListener 接⼝的服务器端组件,它随 Web应⽤的启动⽽启动,只初始化⼀次,然后会⼀直运⾏监视,随Web应⽤的停⽌⽽销毁
作⽤⼀:做⼀些初始化⼯作,web应⽤中spring容器启动ContextLoaderListener
作⽤⼆:监听web中的特定事件,⽐如HttpSession,ServletRequest的创建和销毁;变量的创建、 销毁和修改等。可以在某些动作前后增加处理,实现监控,⽐如统计在线⼈数,利⽤ HttpSessionLisener等。
拦截器(Interceptor):是SpringMVC、Struts等表现层框架⾃⼰的,不会拦截 jsp/html/css/image的访问等,只会拦截访问的控制器⽅法(Handler)。 从配置的⻆度也能够总结发现:serlvet、filter、listener是配置在web.xml中的,⽽interceptor是 配置在表现层框架⾃⼰的配置⽂件中的
- 在Handler业务逻辑执⾏之前拦截⼀次
- 在Handler逻辑执⾏完毕但未跳转⻚⾯之前拦截⼀次
- 在跳转⻚⾯之后拦截⼀次
1.2 拦截器的执⾏流程
在运⾏程序时,拦截器的执⾏是有⼀定顺序的,该顺序与配置⽂件中所定义的拦截器的顺序相关。 单个 拦截器,在程序中的执⾏流程如下图所示:
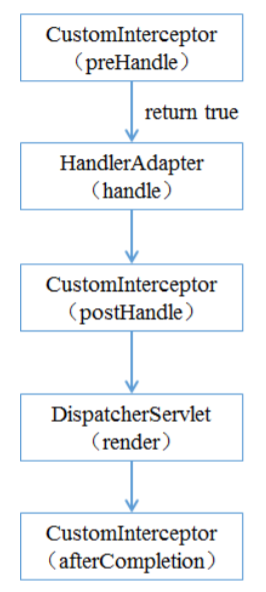
1)程序先执⾏preHandle()⽅法,如果该⽅法的返回值为true,则程序会继续向下执⾏处理器中的⽅ 法,否则将不再向下执⾏。
2)在业务处理器(即控制器Controller类)处理完请求后,会执⾏postHandle()⽅法,然后会通过 DispatcherServlet向客户端返回响应。
3)在DispatcherServlet处理完请求后,才会执⾏afterCompletion()⽅法。
1.3 多个拦截器的执⾏流程
多个拦截器(假设有两个拦截器Interceptor1和Interceptor2,并且在配置⽂件中, Interceptor1拦截 器配置在前),在程序中的执⾏流程如下图所示:

从图可以看出,当有多个拦截器同时⼯作时,它们的preHandle()⽅法会按照配置⽂件中拦截器的配置 顺序执⾏,⽽它们的postHandle()⽅法和afterCompletion()⽅法则会按照配置顺序的反序执⾏。
示例代码
⾃定义SpringMVC拦截器
package com.lagou.edu.interceptor;
import org.springframework.web.servlet.HandlerInterceptor;
import org.springframework.web.servlet.ModelAndView;
import javax.servlet.http.HttpServletRequest;
import javax.servlet.http.HttpServletResponse;
/**
* ⾃定义springmvc拦截器
*/
public class MyIntercepter01 implements HandlerInterceptor {
    /**
 * 会在handler⽅法业务逻辑执⾏之前执⾏
 * 往往在这⾥完成权限校验⼯作
 * @param request
 * @param response
 * @param handler
 * @return 返回值boolean代表是否放⾏,true代表放⾏,false代表中⽌
 * @throws Exception
 */
    @Override
    public boolean preHandle(HttpServletRequest request, HttpServletResponse
                             response, Object handler) throws Exception {
        System.out.println("MyIntercepter01 preHandle......");
        return true;
    }
    /**
 * 会在handler⽅法业务逻辑执⾏之后尚未跳转⻚⾯时执⾏
 * @param request
 * @param response
 * @param handler
 * @param modelAndView 封装了视图和数据,此时尚未跳转⻚⾯呢,你可以在这⾥针对返回的
数据和视图信息进⾏修改
 * @throws Exception
 */
    @Override
    public void postHandle(HttpServletRequest request, HttpServletResponse
                           response, Object handler, ModelAndView modelAndView) throws Exception {
        System.out.println("MyIntercepter01 postHandle......");
    }
    /**
 * ⻚⾯已经跳转渲染完毕之后执⾏
 * @param request
 * @param response
 * @param handler
 * @param ex 可以在这⾥捕获异常
 * @throws Exception
 */
    @Override
    public void afterCompletion(HttpServletRequest request,
                                HttpServletResponse response, Object handler, Exception ex) throws Exception {
        System.out.println("MyIntercepter01 afterCompletion......");
    }
}
注册SpringMVC拦截器
<mvc:interceptors>
    <!--拦截所有handler-->
    <!--<bean class="com.lagou.edu.interceptor.MyIntercepter01"/>-->

    <mvc:interceptor>
        <!--配置当前拦截器的url拦截规则,**代表当前⽬录下及其⼦⽬录下的所有url-->
        <mvc:mapping path="/**"/>
        <!--exclude-mapping可以在mapping的基础上排除⼀些url拦截-->
        <!--<mvc:exclude-mapping path="/demo/**"/>-->
        <bean class="com.lagou.edu.interceptor.MyIntercepter01"/>
    </mvc:interceptor>
    <mvc:interceptor>
        <mvc:mapping path="/**"/>
        <bean class="com.lagou.edu.interceptor.MyIntercepter02"/>
    </mvc:interceptor>

</mvc:interceptors>
第 2 节 处理multipart形式的数据
⽂件上传
原⽣servlet处理上传的⽂件数据的,springmvc⼜是对serlvet的封装
所需jar包
<!--⽂件上传所需jar坐标-->
<dependency>
    <groupId>commons-fileupload</groupId>
    <artifactId>commons-fileupload</artifactId>
    <version>1.3.1</version>
</dependency>
配置⽂件上传解析器
<!--配置⽂件上传解析器,id是固定的multipartResolver-->
<bean id="multipartResolver"
      class="org.springframework.web.multipart.commons.CommonsMultipartResolver">
    <!--设置上传⼤⼩,单位字节-->
    <property name="maxUploadSize" value="1000000000"/>
</bean>
前端Form
<%--
 1 method="post"
 2 enctype="multipart/form-data"
 3 type="file"
--%>
<form method="post" enctype="multipart/form-data" action="/demo/upload">
 <input type="file" name="uploadFile"/>
 <input type="submit" value="上传"/>
</form>
后台接收Handler
@RequestMapping("upload")
public String upload(MultipartFile uploadFile, HttpServletRequest request)
    throws IOException {
    // ⽂件原名,如xxx.jpg
    String originalFilename = uploadFile.getOriginalFilename();
    // 获取⽂件的扩展名,如jpg
    String extendName =
        originalFilename.substring(originalFilename.lastIndexOf(".") + 1,
                                   originalFilename.length());
    String uuid = UUID.randomUUID().toString();
    // 新的⽂件名字
    String newName = uuid + "." + extendName;
    String realPath =
        request.getSession().getServletContext().getRealPath("/uploads");
    // 解决⽂件夹存放⽂件数量限制,按⽇期存放
    String datePath = new SimpleDateFormat("yyyy-MM-dd").format(new Date());
    File floder = new File(realPath + "/" + datePath);
    if(!floder.exists()) {
        floder.mkdirs();
    }
    uploadFile.transferTo(new File(floder,newName));
    return "success";
}
第 3 节 在控制器中处理异常
package com.lagou.edu.controller;
import org.springframework.web.bind.annotation.ControllerAdvice;
import org.springframework.web.bind.annotation.ExceptionHandler;
import org.springframework.web.servlet.ModelAndView;
import javax.servlet.http.HttpServletResponse;
import java.io.IOException;
// 可以让我们优雅的捕获所有Controller对象handler⽅法抛出的异常
@ControllerAdvice
public class GlobalExceptionResolver {
    @ExceptionHandler(ArithmeticException.class)
    public ModelAndView handleException(ArithmeticException exception,
                                        HttpServletResponse response) {
        ModelAndView modelAndView = new ModelAndView();
        modelAndView.addObject("msg",exception.getMessage());
        modelAndView.setViewName("error");
        return modelAndView;
    }
}
第 4 节 基于Flash属性的跨重定向请求数据传递
重定向时请求参数会丢失,我们往往需要重新携带请求参数,我们可以进⾏⼿动参数拼接如下:
return "redirect:handle01?name=" + name;
但是上述拼接参数的⽅法属于get请求,携带参数⻓度有限制,参数安全性也不⾼,此时,我们可以使 ⽤SpringMVC提供的flash属性机制,向上下⽂中添加flash属性,框架会在session中记录该属性值,当 跳转到⻚⾯之后框架会⾃动删除flash属性,不需要我们⼿动删除,通过这种⽅式进⾏重定向参数传递, 参数⻓度和安全性都得到了保障,如下:
/**
 * SpringMVC 重定向时参数传递的问题
 * 转发:A 找 B 借钱400,B没有钱但是悄悄的找到C借了400块钱给A
 * url不会变,参数也不会丢失,⼀个请求
 * 重定向:A 找 B 借钱400,B 说我没有钱,你找别⼈借去,那么A ⼜带着400块的借钱需求找到
C
 * url会变,参数会丢失需要重新携带参数,两个请求
 */
@RequestMapping("/handleRedirect")
public String handleRedirect(String name,RedirectAttributes
                             redirectAttributes) {
    //return "redirect:handle01?name=" + name; // 拼接参数安全性、参数⻓度都有
    局限
        // addFlashAttribute⽅法设置了⼀个flash类型属性,该属性会被暂存到session中,在
        跳转到⻚⾯之后该属性销毁
        redirectAttributes.addFlashAttribute("name",name);
    return "redirect:handle01";
}
第三部分 ⼿写 MVC 框架
- 回顾SpringMVC执⾏的⼤致原理,后续根据这个模仿⼿写⾃⼰的mvc框架
⼿写MVC框架之注解开发
- LagouController
package com.lagou.edu.mvcframework.annotations; import java.lang.annotation.*; @Documented @Target(ElementType.TYPE) @Retention(RetentionPolicy.RUNTIME) public @interface LagouController { String value() default ""; }- LagouService
package com.lagou.edu.mvcframework.annotations; import java.lang.annotation.*; @Documented @Target(ElementType.TYPE) @Retention(RetentionPolicy.RUNTIME) public @interface LagouService { String value() default ""; }- LagouAutowired
package com.lagou.edu.mvcframework.annotations; import java.lang.annotation.*; @Documented @Target(ElementType.FIELD) @Retention(RetentionPolicy.RUNTIME) public @interface LagouAutowired { String value() default ""; }- LagouRequestMapping
package com.lagou.edu.mvcframework.annotations;
import java.lang.annotation.*;
@Documented
@Target({ElementType.TYPE,ElementType.METHOD})
@Retention(RetentionPolicy.RUNTIME)
public @interface LagouRequestMapping {
    String value() default "";
}
LgDispatcherServlet
package com.lagou.edu.mvcframework.servlet;
import com.lagou.demo.service.IDemoService;
import com.lagou.edu.mvcframework.annotations.LagouAutowired;
import com.lagou.edu.mvcframework.annotations.LagouController;
import com.lagou.edu.mvcframework.annotations.LagouRequestMapping;
import com.lagou.edu.mvcframework.annotations.LagouService;
import com.lagou.edu.mvcframework.pojo.Handler;
import org.apache.commons.lang3.StringUtils;
import javax.servlet.ServletConfig;
import javax.servlet.ServletException;
import javax.servlet.http.HttpServlet;
import javax.servlet.http.HttpServletRequest;
import javax.servlet.http.HttpServletResponse;
import java.io.File;
import java.io.IOException;
import java.io.InputStream;
import java.lang.reflect.Field;
import java.lang.reflect.InvocationTargetException;
import java.lang.reflect.Method;
import java.lang.reflect.Parameter;
import java.util.*;
import java.util.regex.Matcher;
import java.util.regex.Pattern;
public class LgDispatcherServlet extends HttpServlet {
    private Properties properties = new Properties();
    private List<String> classNames = new ArrayList<>(); // 缓存扫描到的类的
    全限定类名
        // ioc容器
        private Map<String,Object> ioc = new HashMap<String,Object>();
    // handlerMapping
    //private Map<String,Method> handlerMapping = now HashMap<>(); // 存储
    url和Method之间的映射关系
        private List<Handler> handlerMapping = new ArrayList<>();
    @Override
    public void init(ServletConfig config) throws ServletException {
        // 1 加载配置⽂件 springmvc.properties
        String contextConfigLocation =
            config.getInitParameter("contextConfigLocation");
        doLoadConfig(contextConfigLocation);
        // 2 扫描相关的类,扫描注解
        doScan(properties.getProperty("scanPackage"));

        // 3 初始化bean对象(实现ioc容器,基于注解)
        doInstance();
        // 4 实现依赖注⼊
        doAutoWired();
        // 5 构造⼀个HandlerMapping处理器映射器,将配置好的url和Method建⽴映射关系
        initHandlerMapping();
        System.out.println("lagou mvc 初始化完成....");
        // 等待请求进⼊,处理请求
    }
    /*
 构造⼀个HandlerMapping处理器映射器
 最关键的环节
 ⽬的:将url和method建⽴关联
 */
    private void initHandlerMapping() {
        if(ioc.isEmpty()) {return;}
        for(Map.Entry<String,Object> entry: ioc.entrySet()) {
            // 获取ioc中当前遍历的对象的class类型
            Class<?> aClass = entry.getValue().getClass();
            if(!aClass.isAnnotationPresent(LagouController.class))
            {continue;}
            String baseUrl = "";
            if(aClass.isAnnotationPresent(LagouRequestMapping.class)) {
                LagouRequestMapping annotation =
                    aClass.getAnnotation(LagouRequestMapping.class);
                baseUrl = annotation.value(); // 等同于/demo
            }
            // 获取⽅法
            Method[] methods = aClass.getMethods();
            for (int i = 0; i < methods.length; i++) {
                Method method = methods[i];
                // ⽅法没有标识LagouRequestMapping,就不处理
                if(!method.isAnnotationPresent(LagouRequestMapping.class))
                {continue;}
                // 如果标识,就处理
                LagouRequestMapping annotation =
                    method.getAnnotation(LagouRequestMapping.class);
                String methodUrl = annotation.value(); // /query
                String url = baseUrl + methodUrl; // 计算出来的url
                /demo/query
                    // 把method所有信息及url封装为⼀个Handler
                    Handler handler = new Handler(entry.getValue(),method,
                                                  Pattern.compile(url));
                // 计算⽅法的参数位置信息 // query(HttpServletRequest
                request, HttpServletResponse response,String name)
                    Parameter[] parameters = method.getParameters();
                for (int j = 0; j < parameters.length; j++) {
                    Parameter parameter = parameters[j];
                    if(parameter.getType() == HttpServletRequest.class ||
                       parameter.getType() == HttpServletResponse.class) {
                        // 如果是request和response对象,那么参数名称写
                        HttpServletRequest和HttpServletResponse

                            handler.getParamIndexMapping().put(parameter.getType().getSimpleName(),j)
                            ;
                    }else{

                        handler.getParamIndexMapping().put(parameter.getName(),j); // <name,2>
                    }
                }
                // 建⽴url和method之间的映射关系(map缓存起来)
                handlerMapping.add(handler);
            }
        }
    }
    // 实现依赖注⼊
    private void doAutoWired() {
        if(ioc.isEmpty()) {return;}
        // 有对象,再进⾏依赖注⼊处理
        // 遍历ioc中所有对象,查看对象中的字段,是否有@LagouAutowired注解,如果有需
        要维护依赖注⼊关系
            for(Map.Entry<String,Object> entry: ioc.entrySet()) {
                // 获取bean对象中的字段信息
                Field[] declaredFields =
                    entry.getValue().getClass().getDeclaredFields();
                // 遍历判断处理
                for (int i = 0; i < declaredFields.length; i++) {
                    Field declaredField = declaredFields[i]; //
                    @LagouAutowired private IDemoService demoService;

                    if(!declaredField.isAnnotationPresent(LagouAutowired.class)) {
                        continue;
                    }
                    // 有该注解
                    LagouAutowired annotation =
                        declaredField.getAnnotation(LagouAutowired.class);
                    String beanName = annotation.value(); // 需要注⼊的bean的id
                    if("".equals(beanName.trim())) {
                        // 没有配置具体的bean id,那就需要根据当前字段类型注⼊(接⼝注
                        ⼊) IDemoService
                            beanName = declaredField.getType().getName();
                    }
                    // 开启赋值
                    declaredField.setAccessible(true);
                    try {
                        declaredField.set(entry.getValue(),ioc.get(beanName));
                    } catch (IllegalAccessException e) {
                        e.printStackTrace();
                    }
                }
            }
    }
    // ioc容器
    // 基于classNames缓存的类的全限定类名,以及反射技术,完成对象创建和管理
    private void doInstance() {

        if(classNames.size() == 0) return;
        try{
            for (int i = 0; i < classNames.size(); i++) {
                String className = classNames.get(i); //
                com.lagou.demo.controller.DemoController
                    // 反射
                    Class<?> aClass = Class.forName(className);
                // 区分controller,区分service'
                if(aClass.isAnnotationPresent(LagouController.class)) {
                    // controller的id此处不做过多处理,不取value了,就拿类的⾸字
                    ⺟⼩写作为id,保存到ioc中
                        String simpleName = aClass.getSimpleName();//
                    DemoController
                        String lowerFirstSimpleName = lowerFirst(simpleName);
                    // demoController
                    Object o = aClass.newInstance();
                    ioc.put(lowerFirstSimpleName,o);
                }else if(aClass.isAnnotationPresent(LagouService.class)) {
                    LagouService annotation =
                        aClass.getAnnotation(LagouService.class);
                    //获取注解value值
                    String beanName = annotation.value();
                    // 如果指定了id,就以指定的为准
                    if(!"".equals(beanName.trim())) {
                        ioc.put(beanName,aClass.newInstance());
                    }else{
                        // 如果没有指定,就以类名⾸字⺟⼩写
                        beanName = lowerFirst(aClass.getSimpleName());
                        ioc.put(beanName,aClass.newInstance());
                    }
                    // service层往往是有接⼝的,⾯向接⼝开发,此时再以接⼝名为id,
                    放⼊⼀份对象到ioc中,便于后期根据接⼝类型注⼊
                        Class<?>[] interfaces = aClass.getInterfaces();
                    for (int j = 0; j < interfaces.length; j++) {
                        Class<?> anInterface = interfaces[j];
                        // 以接⼝的全限定类名作为id放⼊

                        ioc.put(anInterface.getName(),aClass.newInstance());
                    }
                }else{
                    continue;
                }
            }
        }catch (Exception e) {
            e.printStackTrace();
        }
    }
    // ⾸字⺟⼩写⽅法
    public String lowerFirst(String str) {
        char[] chars = str.toCharArray();
        if('A' <= chars[0] && chars[0] <= 'Z') {
            chars[0] += 32;
        }
        return String.valueOf(chars);
    }
    // 扫描类
    // scanPackage: com.lagou.demo package----> 磁盘上的⽂件夹(File)
    com/lagou/demo
        private void doScan(String scanPackage) {
        String scanPackagePath =
            Thread.currentThread().getContextClassLoader().getResource("").getPath() +
            scanPackage.replaceAll("\\.", "/");
        File pack = new File(scanPackagePath);
        File[] files = pack.listFiles();
        for(File file: files) {
            if(file.isDirectory()) { // ⼦package
                // 递归
                doScan(scanPackage + "." + file.getName()); //
                com.lagou.demo.controller
            }else if(file.getName().endsWith(".class")) {
                String className = scanPackage + "." +
                    file.getName().replaceAll(".class", "");
                classNames.add(className);
            }

        }
    }
    // 加载配置⽂件
    private void doLoadConfig(String contextConfigLocation) {
        InputStream resourceAsStream =
            this.getClass().getClassLoader().getResourceAsStream(contextConfigLocation
                                                                );
        try {
            properties.load(resourceAsStream);
        } catch (IOException e) {
            e.printStackTrace();
        }
    }
    @Override
    protected void doGet(HttpServletRequest req, HttpServletResponse resp)
        throws ServletException, IOException {
        doPost(req,resp);
    }
    @Override
    protected void doPost(HttpServletRequest req, HttpServletResponse
                          resp) throws ServletException, IOException {
        // 处理请求:根据url,找到对应的Method⽅法,进⾏调⽤
        // 获取uri
        // String requestURI = req.getRequestURI();
        // Method method = handlerMapping.get(requestURI);// 获取到⼀个反射的
        ⽅法
            // 反射调⽤,需要传⼊对象,需要传⼊参数,此处⽆法完成调⽤,没有把对象缓存起来,
            也没有参数!!!!改造initHandlerMapping();
        // method.invoke() //
        // 根据uri获取到能够处理当前请求的hanlder(从handlermapping中(list))
        Handler handler = getHandler(req);
        if(handler == null) {
            resp.getWriter().write("404 not found");
            return;
        }
        // 参数绑定

        // 获取所有参数类型数组,这个数组的⻓度就是我们最后要传⼊的args数组的⻓度
        Class<?>[] parameterTypes =
            handler.getMethod().getParameterTypes();
        // 根据上述数组⻓度创建⼀个新的数组(参数数组,是要传⼊反射调⽤的)
        Object[] paraValues = new Object[parameterTypes.length];
        // 以下就是为了向参数数组中塞值,⽽且还得保证参数的顺序和⽅法中形参顺序⼀致
        Map<String, String[]> parameterMap = req.getParameterMap();
        // 遍历request中所有参数 (填充除了request,response之外的参数)
        for(Map.Entry<String,String[]> param: parameterMap.entrySet()) {
            // name=1&name=2 name [1,2]
            String value = StringUtils.join(param.getValue(), ","); // 如
            同 1,2
                // 如果参数和⽅法中的参数匹配上了,填充数据

                if(!handler.getParamIndexMapping().containsKey(param.getKey()))
                {continue;}
            // ⽅法形参确实有该参数,找到它的索引位置,对应的把参数值放⼊paraValues
            Integer index =
                handler.getParamIndexMapping().get(param.getKey());//name在第 2 个位置
            paraValues[index] = value; // 把前台传递过来的参数值填充到对应的位置
            去
        }
        int requestIndex =
            handler.getParamIndexMapping().get(HttpServletRequest.class.getSimpleName(
        )); // 0
        paraValues[requestIndex] = req;
        int responseIndex =
            handler.getParamIndexMapping().get(HttpServletResponse.class.getSimpleName
                                               ()); // 1
        paraValues[responseIndex] = resp;
        // 最终调⽤handler的method属性
        try {
            handler.getMethod().invoke(handler.getController(),paraValues);
        } catch (IllegalAccessException e) {
            e.printStackTrace();
        } catch (InvocationTargetException e) {
            e.printStackTrace();
        }
    }
    private Handler getHandler(HttpServletRequest req) {
        if(handlerMapping.isEmpty()){return null;}
        String url = req.getRequestURI();
        for(Handler handler: handlerMapping) {
            Matcher matcher = handler.getPattern().matcher(url);
            if(!matcher.matches()){continue;}
            return handler;
        }
        return null;
    }
}
- Pojo类Handler
package com.lagou.edu.mvcframework.pojo;
import javax.sound.midi.MetaEventListener;
import java.lang.reflect.Method;
import java.util.HashMap;
import java.util.Map;
import java.util.regex.Pattern;
/**
* 封装handler⽅法相关的信息
*/
public class Handler {
    private Object controller; // method.invoke(obj,)
    private Method method;

    private Pattern pattern; // spring中url是⽀持正则的
    private Map<String,Integer> paramIndexMapping; // 参数顺序,是为了进⾏参数
    绑定,key是参数名,value代表是第⼏个参数 <name,2>
        public Handler(Object controller, Method method, Pattern pattern) {
        this.controller = controller;
        this.method = method;
        this.pattern = pattern;
        this.paramIndexMapping = new HashMap<>();
    }
    public Object getController() {
        return controller;
    }
    public void setController(Object controller) {
        this.controller = controller;
    }
    public Method getMethod() {
        return method;
    }
    public void setMethod(Method method) {
        this.method = method;
    }
    public Pattern getPattern() {
        return pattern;
    }
    public void setPattern(Pattern pattern) {
        this.pattern = pattern;
    }
    public Map<String, Integer> getParamIndexMapping() {
        return paramIndexMapping;
    }
    public void setParamIndexMapping(Map<String, Integer>
                                     paramIndexMapping) {
        this.paramIndexMapping = paramIndexMapping;
    }
}
- web.xml配置
<!DOCTYPE web-app PUBLIC
"-//Sun Microsystems, Inc.//DTD Web Application 2.3//EN"
"http://java.sun.com/dtd/web-app_2_3.dtd" >
<web-app>
    <display-name>Archetype Created Web Application</display-name>
    <servlet>
        <servlet-name>lgoumvc</servlet-name>
        <servletclass>com.lagou.edu.mvcframework.servlet.LgDispatcherServlet</servletclass>
        <init-param>
            <param-name>contextConfigLocation</param-name>
            <param-value>springmvc.properties</param-value>
        </init-param>
    </servlet>

    <servlet-mapping>
        <servlet-name>lgoumvc</servlet-name>
        <url-pattern>/*</url-pattern>
    </servlet-mapping>
</web-app>
第四部分 Spring MVC 源码深度剖析
第 1 节 前端控制器 DispatcherServlet 继承结构
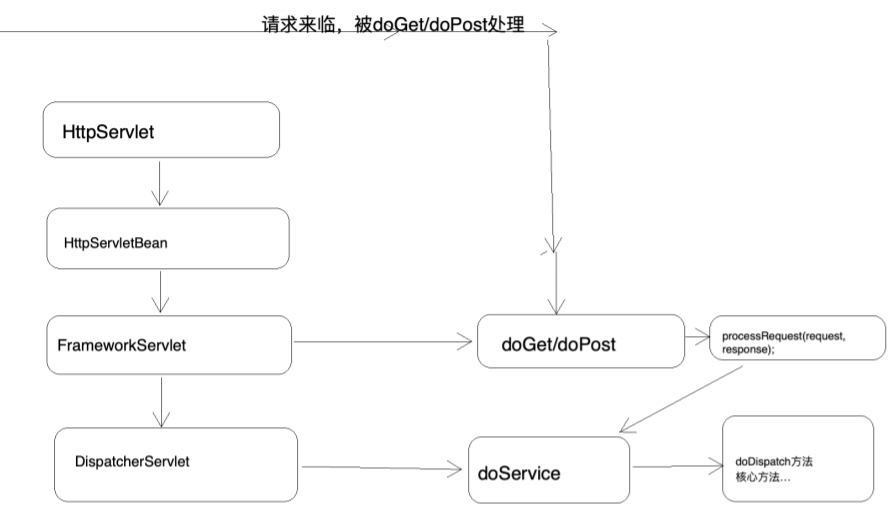
第 2 节 重要时机点分析
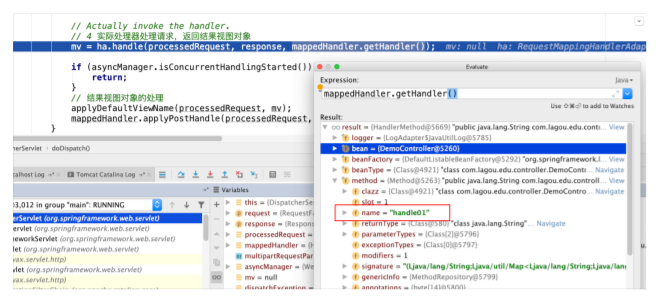
1)Handler⽅法的执⾏时机
打断点
观察调⽤栈
doDispathch⽅法中的1064⾏代码完成handler⽅法的调⽤
2)⻚⾯渲染时机(打断点并观察调⽤栈)
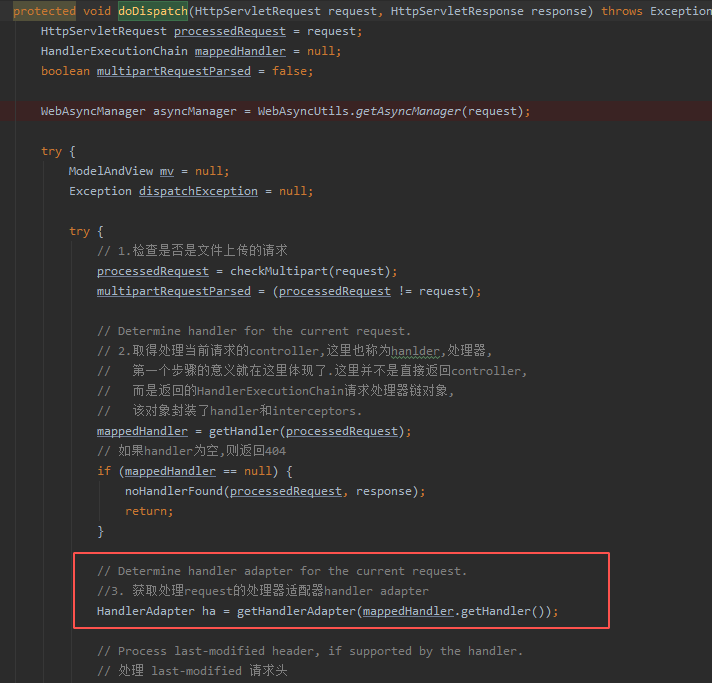
SpringMVC处理请求的流程即为 org.springframework.web.servlet.DispatcherServlet#doDispatch⽅法的执⾏过程,其中步骤 2、3、4、5是核⼼步骤
1)调⽤getHandler()获取到能够处理当前请求的执⾏链 HandlerExecutionChain(Handler+拦截 器)
但是如何去getHandler的?后⾯进⾏分析
2)调⽤getHandlerAdapter();获取能够执⾏1)中Handler的适配器 但是如何去getHandlerAdapter的?后⾯进⾏分析
3)适配器调⽤Handler执⾏ha.handle(总会返回⼀个ModelAndView对象)
4)调⽤processDispatchResult()⽅法完成视图渲染跳转
protected void doDispatch(HttpServletRequest request, HttpServletResponse response) throws Exception {
        HttpServletRequest processedRequest = request;
        HandlerExecutionChain mappedHandler = null;
        boolean multipartRequestParsed = false;

        WebAsyncManager asyncManager = WebAsyncUtils.getAsyncManager(request);

        try {
            ModelAndView mv = null;
            Exception dispatchException = null;

            try {
                processedRequest = checkMultipart(request);
                multipartRequestParsed = (processedRequest != request);

                // Determine handler for the current request.
                mappedHandler = getHandler(processedRequest);
                if (mappedHandler == null) {
                    noHandlerFound(processedRequest, response);
                    return;
                }

                // Determine handler adapter for the current request.
                HandlerAdapter ha = getHandlerAdapter(mappedHandler.getHandler());

                // Process last-modified header, if supported by the handler.
                String method = request.getMethod();
                boolean isGet = "GET".equals(method);
                if (isGet || "HEAD".equals(method)) {
                    long lastModified = ha.getLastModified(request, mappedHandler.getHandler());
                    if (new ServletWebRequest(request, response).checkNotModified(lastModified) && isGet) {
                        return;
                    }
                }

                if (!mappedHandler.applyPreHandle(processedRequest, response)) {
                    return;
                }

                // Actually invoke the handler.
                mv = ha.handle(processedRequest, response, mappedHandler.getHandler());

                if (asyncManager.isConcurrentHandlingStarted()) {
                    return;
                }

                applyDefaultViewName(processedRequest, mv);
                mappedHandler.applyPostHandle(processedRequest, response, mv);
            }
            catch (Exception ex) {
                dispatchException = ex;
            }
            catch (Throwable err) {
                // As of 4.3, we're processing Errors thrown from handler methods as well,
                // making them available for @ExceptionHandler methods and other scenarios.
                dispatchException = new NestedServletException("Handler dispatch failed", err);
            }
            processDispatchResult(processedRequest, response, mappedHandler, mv, dispatchException);
        }
        catch (Exception ex) {
            triggerAfterCompletion(processedRequest, response, mappedHandler, ex);
        }
        catch (Throwable err) {
            triggerAfterCompletion(processedRequest, response, mappedHandler,
                    new NestedServletException("Handler processing failed", err));
        }
        finally {
            if (asyncManager.isConcurrentHandlingStarted()) {
                // Instead of postHandle and afterCompletion
                if (mappedHandler != null) {
                    mappedHandler.applyAfterConcurrentHandlingStarted(processedRequest, response);
                }
            }
            else {
                // Clean up any resources used by a multipart request.
                if (multipartRequestParsed) {
                    cleanupMultipart(processedRequest);
                }
            }
        }
    }
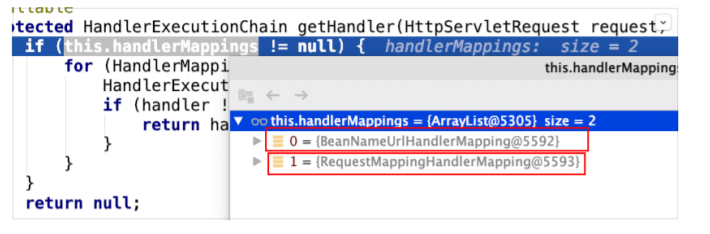
第 3 节 核⼼步骤getHandler⽅法剖析
遍历两个HandlerMapping,试图获取能够处理当前请求的执⾏链
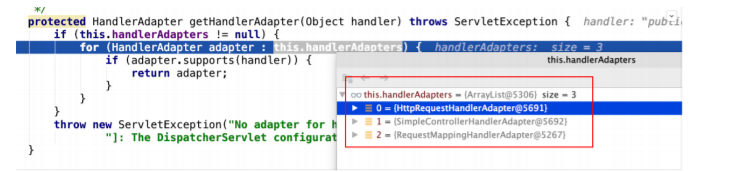
第 4 节 核⼼步骤getHandlerAdapter⽅法剖析
遍历各个HandlerAdapter,看哪个Adapter⽀持处理当前Handler
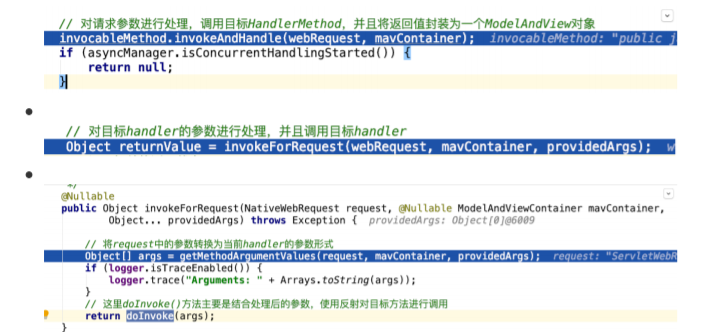
第 5 节 核⼼步骤ha.handle⽅法剖析
- ⼊⼝
- 断点从⼊⼝进⼊

第 6 节 核⼼步骤processDispatchResult⽅法剖析
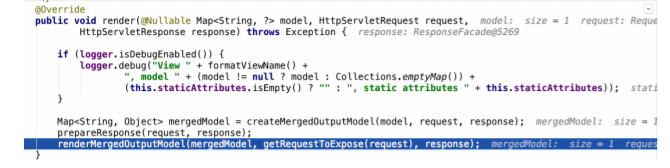
- render⽅法完成渲染
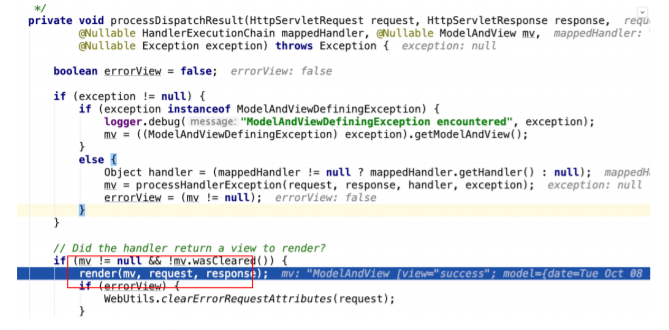
- 视图解析器解析出View视图对象

- 在解析出View视图对象的过程中会判断是否重定向、是否转发等,不同的情况封装的是不同的 View实现
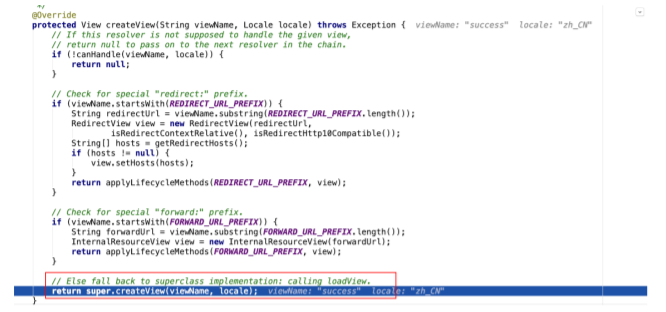
- 解析出View视图对象的过程中,要将逻辑视图名解析为物理视图名

- 封装View视图对象之后,调⽤了view对象的render⽅法
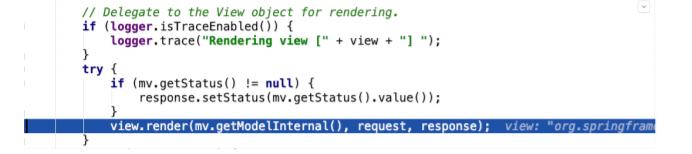
- 渲染数据
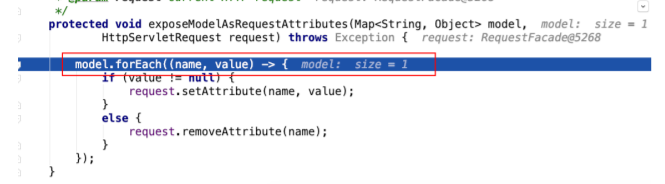
- 把modelMap中的数据暴露到request域中,这也是为什么后台model.add之后在jsp中可以从请求 域取出来的根本原因
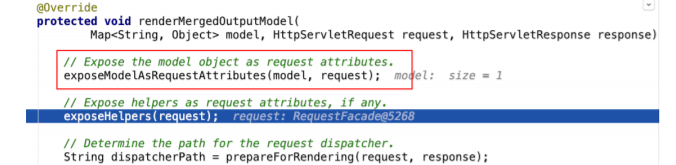
将数据设置到请求域中
第 7 节 SpringMVC九⼤组件初始化
1)在DispatcherServlet中定义了九个属性,每⼀个属性都对应⼀种组件
/** MultipartResolver used by this servlet. */
// 多部件解析器
@Nullable
private MultipartResolver multipartResolver;
/** LocaleResolver used by this servlet. */
// 区域化 国际化解析器
@Nullable
private LocaleResolver localeResolver;
/** ThemeResolver used by this servlet. */
// 主题解析器
@Nullable
private ThemeResolver themeResolver;
/** List of HandlerMappings used by this servlet. */
// 处理器映射器组件
@Nullable
private List<HandlerMapping> handlerMappings;
/** List of HandlerAdapters used by this servlet. */
// 处理器适配器组件
@Nullable
private List<HandlerAdapter> handlerAdapters;
/** List of HandlerExceptionResolvers used by this servlet. */
// 异常解析器组件
@Nullable
private List<HandlerExceptionResolver> handlerExceptionResolvers;
/** RequestToViewNameTranslator used by this servlet. */
// 默认视图名转换器组件
@Nullable
private RequestToViewNameTranslator viewNameTranslator;
/** FlashMapManager used by this servlet. */
// flash属性管理组件
@Nullable
private FlashMapManager flashMapManager;
/** List of ViewResolvers used by this servlet. */
// 视图解析器
@Nullable
private List<ViewResolver> viewResolvers;
九⼤组件都是定义了接⼝,接⼝其实就是定义了该组件的规范,⽐如ViewResolver、HandlerAdapter 等都是接⼝
2)九⼤组件的初始化时机
- DispatcherServlet中的onRefresh(),该⽅法中初始化了九⼤组件
@Override
protected void onRefresh(ApplicationContext context) {

    // 初始化策略
    initStrategies(context);
}
- initStrategies⽅法
/**
     * Initialize the strategy objects that this servlet uses.
     * <p>May be overridden in subclasses in order to initialize further strategy objects.
     */
//初始化策略
protected void initStrategies(ApplicationContext context) {
    //多文件上传的组件
    initMultipartResolver(context);
    //初始化本地语言环境
    initLocaleResolver(context);
    //初始化模板处理器
    initThemeResolver(context);
    //handlerMapping
    initHandlerMappings(context);
    //初始化参数适配器
    initHandlerAdapters(context);
    //初始化异常拦截器
    initHandlerExceptionResolvers(context);
    //初始化视图预处理器
    initRequestToViewNameTranslator(context);
    //初始化视图转换器
    initViewResolvers(context);
    // 初始化FlashMap管理器
    initFlashMapManager(context);
}
- 观察其中的⼀个组件initHandlerMappings(context)
/**
     * Initialize the HandlerMappings used by this class.
     * <p>If no HandlerMapping beans are defined in the BeanFactory for this namespace,
     * we default to BeanNameUrlHandlerMapping.
     */
private void initHandlerMappings(ApplicationContext context) {
    this.handlerMappings = null;

    if (this.detectAllHandlerMappings) {
        // Find all HandlerMappings in the ApplicationContext, including ancestor contexts.
        Map<String, HandlerMapping> matchingBeans =
            BeanFactoryUtils.beansOfTypeIncludingAncestors(context, HandlerMapping.class, true, false);
        if (!matchingBeans.isEmpty()) {
            this.handlerMappings = new ArrayList<>(matchingBeans.values());
            // We keep HandlerMappings in sorted order.
            AnnotationAwareOrderComparator.sort(this.handlerMappings);
        }
    }
    else {
        try {
            HandlerMapping hm = context.getBean(HANDLER_MAPPING_BEAN_NAME, HandlerMapping.class);
            this.handlerMappings = Collections.singletonList(hm);
        }
        catch (NoSuchBeanDefinitionException ex) {
            // Ignore, we'll add a default HandlerMapping later.
        }
    }

    // Ensure we have at least one HandlerMapping, by registering
    // a default HandlerMapping if no other mappings are found.
    if (this.handlerMappings == null) {
        // 走默认策略
        this.handlerMappings = getDefaultStrategies(context, HandlerMapping.class);
        if (logger.isDebugEnabled()) {
            logger.debug("No HandlerMappings found in servlet '" + getServletName() + "': using default");
        }
    }
}
如果按照类型和按照固定id从ioc容器中找不到对应组件,则会按照默认策略进⾏注册初始化,默 认策略在DispatcherServlet.properties⽂件中配置
@SuppressWarnings("unchecked")
protected <T> List<T> getDefaultStrategies(ApplicationContext context, Class<T> strategyInterface) {
    String key = strategyInterface.getName();
    String value = defaultStrategies.getProperty(key);
    if (value != null) {
        String[] classNames = StringUtils.commaDelimitedListToStringArray(value);
        List<T> strategies = new ArrayList<>(classNames.length);
        for (String className : classNames) {
            try {
                Class<?> clazz = ClassUtils.forName(className, DispatcherServlet.class.getClassLoader());
                Object strategy = createDefaultStrategy(context, clazz);
                strategies.add((T) strategy);
            }
            catch (ClassNotFoundException ex) {
                throw new BeanInitializationException(
                    "Could not find DispatcherServlet's default strategy class [" + className +
                    "] for interface [" + key + "]", ex);
            }
            catch (LinkageError err) {
                throw new BeanInitializationException(
                    "Error loading DispatcherServlet's default strategy class [" + className +
                    "] for interface [" + key + "]: problem with class file or dependent class", err);
            }
        }
        return strategies;
    }
    else {
        return new LinkedList<>();
    }
}
org/springframework/web/servlet/DispatcherServlet.properties
# Default implementation classes for DispatcherServlet's strategy interfaces.
# Used as fallback when no matching beans are found in the DispatcherServlet context.
# Not meant to be customized by application developers.

org.springframework.web.servlet.LocaleResolver=org.springframework.web.servlet.i18n.AcceptHeaderLocaleResolver

org.springframework.web.servlet.ThemeResolver=org.springframework.web.servlet.theme.FixedThemeResolver

org.springframework.web.servlet.HandlerMapping=org.springframework.web.servlet.handler.BeanNameUrlHandlerMapping,\
    org.springframework.web.servlet.mvc.method.annotation.RequestMappingHandlerMapping

org.springframework.web.servlet.HandlerAdapter=org.springframework.web.servlet.mvc.HttpRequestHandlerAdapter,\
    org.springframework.web.servlet.mvc.SimpleControllerHandlerAdapter,\
    org.springframework.web.servlet.mvc.method.annotation.RequestMappingHandlerAdapter

org.springframework.web.servlet.HandlerExceptionResolver=org.springframework.web.servlet.mvc.method.annotation.ExceptionHandlerExceptionResolver,\
    org.springframework.web.servlet.mvc.annotation.ResponseStatusExceptionResolver,\
    org.springframework.web.servlet.mvc.support.DefaultHandlerExceptionResolver

org.springframework.web.servlet.RequestToViewNameTranslator=org.springframework.web.servlet.view.DefaultRequestToViewNameTranslator

org.springframework.web.servlet.ViewResolver=org.springframework.web.servlet.view.InternalResourceViewResolver

org.springframework.web.servlet.FlashMapManager=org.springframework.web.servlet.support.SessionFlashMapManager
注意:多部件解析器这样的的初始化必须按照id注册对象(multipartResolver)
this.multipartResolver = context.getBean(MULTIPART_RESOLVER_BEAN_NAME, MultipartResolver.class);
private void initMultipartResolver(ApplicationContext context) {
    try {
        this.multipartResolver = context.getBean(MULTIPART_RESOLVER_BEAN_NAME, MultipartResolver.class);
        if (logger.isDebugEnabled()) {
            logger.debug("Using MultipartResolver [" + this.multipartResolver + "]");
        }
    }
    catch (NoSuchBeanDefinitionException ex) {
        // Default is no multipart resolver.
        this.multipartResolver = null;
        if (logger.isDebugEnabled()) {
            logger.debug("Unable to locate MultipartResolver with name '" + MULTIPART_RESOLVER_BEAN_NAME +
                         "': no multipart request handling provided");
        }
    }
}
MULTIPART_RESOLVER_BEAN_NAME 在上面定义
public static final String MULTIPART_RESOLVER_BEAN_NAME = "multipartResolver";
第五部分 SSM 整合
第 1 节 整合策略
SSM = Spring + SpringMVC + Mybatis = (Spring + Mybatis)+ SpringMVC
先整合 Spring + Mybatis
然后再整合 SpringMVC
基于的需求:查询 Account 表的全部数据显示到⻚⾯
第 2 节 Mybatis整合Spring
整合⽬标
- 数据库连接池以及事务管理都交给Spring容器来完成
- SqlSessionFactory对象应该放到Spring容器中作为单例对象管理
- Mapper动态代理对象交给Spring管理,我们从Spring容器中直接获得Mapper的代理对象
整合所需 Jar 分析
- Junit测试jar(4.12版本)
- Mybatis的jar(3.4.5)
- Spring相关jar(spring-context、spring-test、spring-jdbc、spring-tx、spring-aop、 aspectjweaver)
- Mybatis/Spring整合包jar(mybatis-spring-xx.jar)
- Mysql数据库驱动jar
- Druid数据库连接池的jar
- 整合后的 Pom 坐标
<!--junit-->
<dependency>
 <groupId>junit</groupId>
 <artifactId>junit</artifactId>
 <version>4.12</version>
 <scope>test</scope>
</dependency>
<!--mybatis-->
<dependency>
 <groupId>org.mybatis</groupId>
 <artifactId>mybatis</artifactId>
 <version>3.4.5</version>
</dependency>
<!--spring相关-->
<dependency>
 <groupId>org.springframework</groupId>
 <artifactId>spring-context</artifactId>
 <version>5.1.12.RELEASE</version>
</dependency>
<dependency>
     <groupId>org.springframework</groupId>
 <artifactId>spring-test</artifactId>
 <version>5.1.12.RELEASE</version>
</dependency>
<dependency>
 <groupId>org.springframework</groupId>
 <artifactId>spring-jdbc</artifactId>
 <version>5.1.12.RELEASE</version>
</dependency>
<dependency>
 <groupId>org.springframework</groupId>
 <artifactId>spring-tx</artifactId>
 <version>5.1.12.RELEASE</version>
</dependency>
<dependency>
 <groupId>org.springframework</groupId>
 <artifactId>spring-aop</artifactId>
 <version>5.1.12.RELEASE</version>
</dependency>
<dependency>
 <groupId>org.aspectj</groupId>
 <artifactId>aspectjweaver</artifactId>
 <version>1.8.9</version>
</dependency>
<!--mybatis与spring的整合包-->
<dependency>
 <groupId>org.mybatis</groupId>
 <artifactId>mybatis-spring</artifactId>
 <version>2.0.3</version>
</dependency>
<!--数据库驱动jar-->
<dependency>
 <groupId>mysql</groupId>
 <artifactId>mysql-connector-java</artifactId>
 <version>5.1.46</version>
</dependency>
<!--druid连接池-->
<dependency>
 <groupId>com.alibaba</groupId>
 <artifactId>druid</artifactId>
 <version>1.1.21</version>
</dependency>
- jdbc.properties
jdbc.driver=com.mysql.jdbc.Driver
jdbc.url=jdbc:mysql://localhost:3306/bank
jdbc.username=root
jdbc.password=123456
- Spring 配置⽂件
applicationContext-dao.xml
<?xml version="1.0" encoding="UTF-8"?>
<beans xmlns="http://www.springframework.org/schema/beans"
 xmlns:context="http://www.springframework.org/schema/context"
 xmlns:tx="http://www.springframework.org/schema/tx"
 xmlns:xsi="http://www.w3.org/2001/XMLSchema-instance"
 xsi:schemaLocation="
 http://www.springframework.org/schema/beans
 http://www.springframework.org/schema/beans/spring-beans.xsd
 http://www.springframework.org/schema/context
 http://www.springframework.org/schema/context/spring-context.xsd
 http://www.springframework.org/schema/tx
 http://www.springframework.org/schema/tx/spring-tx.xsd
">
 <!--包扫描-->
 <context:component-scan base-package="com.lagou.edu.mapper"/>
 <!--数据库连接池以及事务管理都交给Spring容器来完成-->
 <!--引⼊外部资源⽂件-->
 <context:property-placeholder
location="classpath:jdbc.properties"/>
 <!--第三⽅jar中的bean定义在xml中-->
 <bean id="dataSource"
class="com.alibaba.druid.pool.DruidDataSource">
 <property name="driverClassName" value="${jdbc.driver}"/>
 <property name="url" value="${jdbc.url}"/>
 <property name="username" value="${jdbc.username}"/>
 <property name="password" value="${jdbc.password}"/>
 </bean>
 <!--SqlSessionFactory对象应该放到Spring容器中作为单例对象管理
 原来mybaits中sqlSessionFactory的构建是需要素材的:SqlMapConfig.xml中的内
容
 -->
 <bean id="sqlSessionFactory"
class="org.mybatis.spring.SqlSessionFactoryBean">
 <!--别名映射扫描-->
 <property name="typeAliasesPackage" value="com.lagou.edu.pojo"/>
 <!--数据源dataSource-->
 <property name="dataSource" ref="dataSource"/>
 </bean>
 <!--Mapper动态代理对象交给Spring管理,我们从Spring容器中直接获得Mapper的代理对
象-->
 <!--扫描mapper接⼝,⽣成代理对象,⽣成的代理对象会存储在ioc容器中-->
 <bean class="org.mybatis.spring.mapper.MapperScannerConfigurer">
 <!--mapper接⼝包路径配置-->
 <property name="basePackage" value="com.lagou.edu.mapper"/>
 <property name="sqlSessionFactoryBeanName"
value="sqlSessionFactory"/>
 </bean>
</beans>
applicationContext-service.xml
<?xml version="1.0" encoding="UTF-8"?>
<beans xmlns="http://www.springframework.org/schema/beans"
 xmlns:lgContext="http://www.springframework.org/schema/context"
 xmlns:tx="http://www.springframework.org/schema/tx"
 xmlns:xsi="http://www.w3.org/2001/XMLSchema-instance"
 xsi:schemaLocation="
 http://www.springframework.org/schema/beans
 http://www.springframework.org/schema/beans/spring-beans.xsd
 http://www.springframework.org/schema/context
 http://www.springframework.org/schema/context/spring-context.xsd
 http://www.springframework.org/schema/tx
 http://www.springframework.org/schema/tx/spring-tx.xsd
">
 <!--包扫描-->
 <lgContext:component-scan base-package="com.lagou.edu.service"/>
 <!--事务管理-->
 <bean id="transactionManager"
class="org.springframework.jdbc.datasource.DataSourceTransactionManager">
 <property name="dataSource" ref="dataSource"/>
 </bean>
   <!--事务管理注解驱动-->
 <tx:annotation-driven transaction-manager="transactionManager"/>
</beans>
AccountMapper接⼝
package com.lagou.edu.mapper;
import com.lagou.edu.pojo.Account;
import java.util.List;
public interface AccountMapper {
    // 定义dao层接⼝⽅法--> 查询account表所有数据
    List<Account> queryAccountList() throws Exception;
}
AccountMapper.xml
<!DOCTYPE mapper PUBLIC "-//mybatis.org//DTD Mapper 3.0//EN"
"http://mybatis.org/dtd/mybatis-3-mapper.dtd">
<mapper namespace="com.lagou.edu.mapper.AccountMapper">
    <select id="queryAccountList" resultType="com.lagou.edu.pojo.Account">
        select * from account
    </select>
</mapper>
测试程序
import com.lagou.edu.pojo.Account;
import com.lagou.edu.service.AccountService;
import org.junit.Test;
import org.junit.runner.RunWith;
import org.springframework.beans.factory.annotation.Autowired;
import org.springframework.test.context.ContextConfiguration;
import org.springframework.test.context.junit4.SpringJUnit4ClassRunner;
import java.util.List;
@RunWith(SpringJUnit4ClassRunner.class)
@ContextConfiguration(locations = {"classpath*:application*.xml"})
public class MybatisSpringTest {
    // 希望测试ioc容器中的哪个对象你注⼊即可。
    @Autowired
    private AccountService accountService;
    @Test
    public void testMybatisSpring() throws Exception {
        List<Account> accounts = accountService.queryAccountList();
        for (int i = 0; i < accounts.size(); i++) {
            Account account = accounts.get(i);
            System.out.println(account);
        }
    }
}
第 3 节 整合SpringMVC
整合思路
把SpringMVC的⼊⻔案例整合进来即可(在已有⼯程基础之上开发⼀个SpringMVC⼊⻔案例)
引⼊pom坐标
<!--SpringMVC-->
<dependency>
 <groupId>org.springframework</groupId>
 <artifactId>spring-webmvc</artifactId>
 <version>5.1.12.RELEASE</version>
</dependency>
<!--jsp-api&servlet-api-->
<dependency>
 <groupId>javax.servlet</groupId>
 <artifactId>jsp-api</artifactId>
 <version>2.0</version>
 <scope>provided</scope>
</dependency>
<dependency>
 <groupId>javax.servlet</groupId>
 <artifactId>javax.servlet-api</artifactId>
 <version>3.1.0</version>
 <scope>provided</scope>
</dependency>
<!--⻚⾯使⽤jstl表达式-->
<dependency>
 <groupId>jstl</groupId>
 <artifactId>jstl</artifactId>
 <version>1.2</version>
</dependency>
<dependency>
 <groupId>taglibs</groupId>
 <artifactId>standard</artifactId>
 <version>1.1.2</version>
</dependency>
<!--json数据交互所需jar,start-->
<dependency>
 <groupId>com.fasterxml.jackson.core</groupId>
 <artifactId>jackson-core</artifactId>
 <version>2.9.0</version>
</dependency>
<dependency>
 <groupId>com.fasterxml.jackson.core</groupId>
 <artifactId>jackson-databind</artifactId>
 <version>2.9.0</version>
</dependency>
<dependency>
 <groupId>com.fasterxml.jackson.core</groupId>
 <artifactId>jackson-annotations</artifactId>
 <version>2.9.0</version>
</dependency>
<!--json数据交互所需jar,end-->
添加SpringMVC ⼊⻔案例
springmvc.xml
<?xml version="1.0" encoding="UTF-8"?>
<beans xmlns="http://www.springframework.org/schema/beans"
 xmlns:context="http://www.springframework.org/schema/context"
 xmlns:mvc="http://www.springframework.org/schema/mvc"
 xmlns:xsi="http://www.w3.org/2001/XMLSchema-instance"
 xsi:schemaLocation="http://www.springframework.org/schema/beans
 http://www.springframework.org/schema/beans/spring-beans.xsd
 http://www.springframework.org/schema/context
 http://www.springframework.org/schema/context/springcontext.xsd
 http://www.springframework.org/schema/mvc
 http://www.springframework.org/schema/mvc/spring-mvc.xsd
">
 <!--扫描controller-->
 <context:component-scan base-package="com.lagou.edu.controller"/>
 <mvc:annotation-driven/>
</beans>
Controller类
package com.lagou.edu.controller;
import com.lagou.edu.pojo.Account;
import com.lagou.edu.service.AccountService;
import org.springframework.beans.factory.annotation.Autowired;
import org.springframework.stereotype.Controller;
import org.springframework.web.bind.annotation.RequestMapping;
import org.springframework.web.bind.annotation.ResponseBody;
import java.util.List;
@Controller
@RequestMapping("/account")
public class AccountController {
    /**
 * Spring容器和SpringMVC容器是有层次的(⽗⼦容器)
 * Spring容器:service对象+dao对象
 * SpringMVC容器:controller对象,,,,可以引⽤到Spring容器中的对象
 */
    @Autowired
    private AccountService accountService;
    @RequestMapping("/queryAll")
    @ResponseBody
    public List<Account> queryAll() throws Exception {
        return accountService.queryAccountList();
    }
}
web.xml
<!DOCTYPE web-app PUBLIC
"-//Sun Microsystems, Inc.//DTD Web Application 2.3//EN"
"http://java.sun.com/dtd/web-app_2_3.dtd" >
<web-app>
    <display-name>Archetype Created Web Application</display-name>
    <context-param>
        <param-name>contextConfigLocation</param-name>
        <param-value>classpath*:applicationContext*.xml</param-value>
    </context-param>
    <!--spring框架启动-->
    <listener>
        <listenerclass>org.springframework.web.context.ContextLoaderListener</listenerclass>
    </listener>
    <!--springmvc启动-->
    <servlet>
        <servlet-name>springmvc</servlet-name>
        <servletclass>org.springframework.web.servlet.DispatcherServlet</servletclass>
        <init-param>
            <param-name>contextConfigLocation</param-name>
            <param-value>classpath*:springmvc.xml</param-value>
        </init-param>
        <load-on-startup>1</load-on-startup>
    </servlet>

    <servlet-mapping>
        <servlet-name>springmvc</servlet-name>
        <url-pattern>/</url-pattern>
    </servlet-mapping>
</web-app>
第六部分 附录
附录⼀ 乱码问题解决
Post请求乱码,web.xml中加⼊过滤器
<!-- 解决post乱码问题 -->
<filter>
    <filter-name>encoding</filter-name>
    <filter-class>
        org.springframework.web.filter.CharacterEncodingFilter
    </filter-class>
    <!-- 设置编码参是UTF8 -->
    <init-param>
        <param-name>encoding</param-name>
        <param-value>UTF-8</param-value>
    </init-param>
    <init-param>
        <param-name>forceEncoding</param-name>
        <param-value>true</param-value>
    </init-param>
</filter>
<filter-mapping>
    <filter-name>encoding</filter-name>
    <url-pattern>/*</url-pattern>
</filter-mapping>
Get请求乱码(Get请求乱码需要修改tomcat下server.xml的配置)
<Connector URIEncoding="utf-8" connectionTimeout="20000" port="8080"
protocol="HTTP/1.1" redirectPort="8443"/>
附录⼆ 玩转Spring MVC 必备设计模式
说明:本部分设计模式作为直播扩展内容的⼀部分
1)策略模式
策略模式(Strategy),就是⼀个问题有多种解决⽅案,选择其中的⼀种使⽤,这种情况下我们 使⽤策略模式来实现灵活地选择,也能够⽅便地增加新的解决⽅案。⽐如做数学题,⼀个问题的 解法可能有多种;再⽐如商场的打折促销活动,打折⽅案也有很多种,有些商品是不参与折扣活 动要按照原价销售,有些商品打8.5折,有些打6折,有些是返现5元等。
- 结构
策略(Strategy)
定义所有⽀持算法的公共接⼝。 Context 使⽤这个接⼝来调⽤某 ConcreteStrategy 定义的算法。
策略实现(ConcreteStrategy) 实现了Strategy 接⼝的具体算法
上下⽂(Context) 维护⼀个 Strategy 对象的引⽤ ⽤⼀个 ConcreteStrategy 对象来装配
可定义⼀个接⼝⽅法让 Strategy 访问它的数据
示例
假如现在有⼀个商场优惠活动,有的商品原价售卖,有的商品打8.5折,有的商品打6折,有的返现 5元
package designpattern.strategy.old;
import java.text.MessageFormat;
public class BuyGoods {
    private String goods;
    private double price;

    private double finalPrice;
    private String desc;
    public BuyGoods(String goods, double price) {
        this.goods = goods;
        this.price = price;
    }
    public double calculate(String discountType) {
        if ("discount85".equals(discountType)) {
            finalPrice = price * 0.85;
            desc = "该商品可享受8.5折优惠";
        } else if ("discount6".equals(discountType)) {
            finalPrice = price * 0.6;
            desc = "该商品可享受6折优惠";
        } else if ("return5".equals(discountType)) {
            finalPrice = price >= 5 ? price - 5 : 0;
            desc = "该商品可返现5元";
        } else {
            finalPrice = price;
            desc = "对不起,该商品不参与优惠活动";
        }
        System.out.println(MessageFormat.format("您购买的商品为:{0},原价为:{1},{2},最终售卖价格为:{3}", goods, price, desc, finalPrice));
        return finalPrice;
    }
}
测试
package designpattern.strategy.old;
public class Test {
    public static void main(String[] args) {
        BuyGoods buyGoods1 = new BuyGoods("Java编程思想", 99.00);
        buyGoods1.calculate("discount85");
        BuyGoods buyGoods2 = new BuyGoods("罗技⿏标", 66 );
        buyGoods2.calculate("discount6");
        BuyGoods buyGoods3 = new BuyGoods("苹果笔记本", 15000.00);
        buyGoods3.calculate("return5");
        BuyGoods buyGoods4 = new BuyGoods("佳能相机", 1900);
        buyGoods4.calculate(null);
    }
}
上述代码可以解决问题,但是从代码设计的⻆度还是存在⼀些问题
- 增加或者修改打折⽅案时必须修改 BuyGoods 类源代码,违反了⾯向对象设计的 "开闭原 则",代码的灵活性和扩展性较差。
- 打折⽅案代码聚合在⼀起,如果其他项⽬需要重⽤某个打折⽅案的代码,只能复制粘贴对应 代码,⽆法以类组件的⽅式进⾏重⽤,代码的复⽤性差。
- BuyGoods 类的 calculate() ⽅法随着优惠⽅案的增多会⾮常庞⼤,代码中会出现很多if分 ⽀,可维护性差。
此时,我们可以使⽤策略模式对 BuyGoods 类进⾏重构,将打折⽅案逻辑(算法)的定义和使⽤ 分离。 抽象策略类 AbstractDiscount,它是所有具体打折⽅案(算法)的⽗类,定义了⼀个 discount 抽象⽅法
package designpattern.strategy.now.discount;
public abstract class AbstractDiscount {
    public double getFinalPrice() {
        return finalPrice;
    }
    public void setFinalPrice(double finalPrice) {
        this.finalPrice = finalPrice;
    }
    public String getDesc() {
        return desc;
    }
    public void setDesc(String desc) {
        this.desc = desc;
    }
    protected double finalPrice;
    protected String desc;
    public IDiscount(String desc) {
        this.desc = desc;
    }
    public abstract double discount(double price);
}
四种具体策略类,继承⾃抽象策略类 AbstractDiscount,并在 discount ⽅法中实现具体的打折 ⽅案(算法)
package designpattern.strategy.now.discount.impl;
import designpattern.strategy.now.discount.AbstractDiscount;
public class Discount85 extends AbstractDiscount {
    public Discount85() {
        super("该商品可享受8.5折优惠");
    }
    @Override
    public double discount(double price) {
        finalPrice = price * 0.85;
        return finalPrice;
    }
}
package designpattern.strategy.now.discount.impl;
import designpattern.strategy.now.discount.AbstractDiscount;
public class Discount6 extends AbstractDiscount {
    public Discount6() {
        super("该商品可享受6折优惠");
    }
    @Override
    public double discount(double price) {
        finalPrice = price * 0.6;
        return finalPrice;
    }
}
package designpattern.strategy.now.discount.impl;
import designpattern.strategy.now.discount.AbstractDiscount;
public class Return5 extends AbstractDiscount {
    public Return5() {
        super("该商品可返现5元");
    }
    @Override
    public double discount(double price) {
        this.finalPrice = price >= 5 ? price - 5 : 0;
        return finalPrice;
    }
}
package designpattern.strategy.now.discount.impl;
import designpattern.strategy.now.discount.AbstractDiscount;
public class NoDiscount extends AbstractDiscount {
    public NoDiscount() {
        super("对不起,该商品不参与优惠活动");
    }
    @Override
    public double discount(double price) {
        finalPrice = price;
        return finalPrice;
    }
}
类 BuyGoods,维护了⼀个 AbstractDiscount 引⽤
package designpattern.strategy.now;
import designpattern.strategy.now.discount.AbstractDiscount;
import java.text.MessageFormat;
public class BuyGoods {
    private String goods;
    private double price;
    private AbstractDiscount abstractDiscount;
    public BuyGoods(String goods, double price, AbstractDiscount
                    abstractDiscount) {
        this.goods = goods;
        this.price = price;
        this.abstractDiscount = abstractDiscount;
    }
    public double calculate() {
        double finalPrice = abstractDiscount.discount(this.price);
        String desc = abstractDiscount.getDesc();
        System.out.println(MessageFormat.format("商品:{0},原价:{1},{2},最终价格为:{3}", goods, price, desc, finalPrice));
        return finalPrice;
    }
}
测试
package designpattern.strategy.now;

import designpattern.strategy.now.discount.impl.*;
public class Test {
    public static void main(String[] args) {
        BuyGoods buyGoods1 = new BuyGoods("Java编程思想", 99.00, new
                                          Discount85());
        buyGoods1.calculate();
        BuyGoods buyGoods2 = new BuyGoods("罗技⿏标", 66, new Discount6());
        buyGoods2.calculate();
        BuyGoods buyGoods3 = new BuyGoods("苹果笔记本", 15000.00, new
                                          Return5());
        buyGoods3.calculate();
        BuyGoods buyGoods4 = new BuyGoods("佳能相机", 1900, new
                                          NoDiscount());
        buyGoods4.calculate();
    }
}
重构后:
- 增加新的优惠⽅案时只需要继承抽象策略类即可,修改优惠⽅案时不需要修改BuyGoods类 源码;
- 代码复⽤也变得简单,直接复⽤某⼀个具体策略类即可;
- BuyGoods类的calculate变得简洁,没有了原本的if分⽀;
2)模板⽅法模式
模板⽅法模式是指定义⼀个算法的⻣架,并允许⼦类为⼀个或者多个步骤提供实现。模板⽅法模式 使得⼦类可以在不改变算法结构的情况下,重新定义算法的某些步骤,属于⾏为型设计模式。 采⽤模板⽅法模式的核⼼思路是处理某个流程的代码已经具备,但其中某些节点的代码暂时不能确 定。此时可以使⽤模板⽅法。
示例
  package com.lagou.edu;
  /**
⾯试⼤⼚流程类 */ public abstract class Interview { private final void register() {
System.out.println("⾯试登记");} protected abstract void communicate(); private final void notifyResult() {
System.out.println("HR⼩姐姐通知⾯试结果");} protected final void process() {
  this.register();
  this.communicate();
  this.notifyResult();
} }
Java岗位⾯试者
package com.lagou.edu;
/**
* ⾯试⼈员1,它是来⾯试Java⼯程师的
*/
public class Interviewee1 extends Interview{
    public void communicate() {
        System.out.println("我是⾯试⼈员1,来⾯试Java⼯程师,我们聊的是Java相关内容");
    }
}
前端岗位⾯试者
package com.lagou.edu;
/**
* ⾯试⼈员2,它是来⾯试前端⼯程师的
*/
public class Interviewee2 extends Interview{
    public void communicate() {
        System.out.println("我是⾯试⼈员2,来⾯试前端⼯程师,我们聊的是前端相关内容");
    }
}
客户端测试类
package com.lagou.edu;
public class InterviewTest {
    public static void main(String[] args) {
        // ⾯试Java⼯程师
        Interview interviewee1 = new Interviewee1();
        interviewee1.process();
        // ⾯试前端⼯程师
        Interview interviewee2 = new Interviewee2();
        interviewee2.process();
    }
}
打印结果

3)适配器模式
使得原本由于接⼝不兼容⽽不能⼀起⼯作、不能统⼀管理的那些类可以⼀起⼯作、可以进⾏统⼀管理
- 解决接⼝不兼容⽽不能⼀起⼯作问题,看下⾯⼀个⾮常经典的案例 在中国,⺠⽤电都是220v交流电,但是⼿机锂电池⽤的都是5v直流电。因此,我们给⼿机充电时 就需要使⽤电源适配器来进⾏转换。使⽤代码还原这个⽣活场景 创建AC220类,表示220v交流电
package com.lagou.edu;
import com.sun.org.apache.bcel.internal.generic.RETURN;
public class AC220 {
    public int outputAC220V() {
        int output = 220;
        System.out.println("输出交流电" + output + "V");
        return output;
    }
}
创建DC5接⼝,表示5V直流电:
package com.lagou.edu;
public interface DC5 {
    int outputDC5V();
}
创建电源适配器类 PowerAdapter
package com.lagou.edu;
public class PowerAdapter implements DC5 {
    private AC220 ac220;
    public PowerAdapter(AC220 ac220) {
        this.ac220 = ac220;
    }
    public int outputDC5V() {
        int adapterInput = ac220.outputAC220V();
        // 变压器...
        int adapterOutput = adapterInput/44;
        System.out.println("使⽤ PowerAdapter 输⼊AC:" + adapterInput + "V输出DC:" + adapterOutput + "V");
        return adapterOutput;
    }
}
客户端测试代码
package com.lagou.edu;
public class AdapterTest {
    public static void main(String[] args) {
        DC5 dc5 = new PowerAdapter(new AC220());
        dc5.outputDC5V();
    }
}
在上⾯的案例中,通过增加电源适配器类PowerAdapter实现了⼆者的兼容
- 解决不能统⼀管理的问题
SpringMVC中处理器适配器(HandlerAdapter)机制就是解决类统⼀管理问题⾮常经典的场景
其中 HandlerAdapter接⼝是处理器适配器的顶级接⼝,它有多个⼦类,包括 AbstractHandlerMethodAdapter、SimpleServletHandlerAdapter、 SimpleControllerHandlerAdapter、HttpRequestHandlerAdapter、 RequestMappingHandlerAdapter
其适配器调⽤的关键代码也在DispatcherServlet的doDispatch()⽅法中
在 doDispatch() ⽅法中调⽤了 getHandlerAdapter() ⽅法
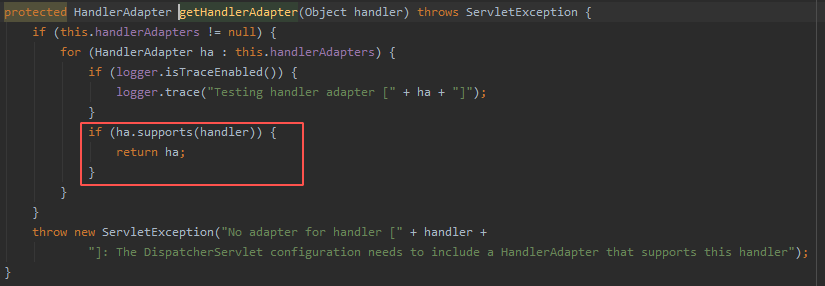
在 getHandlerAdapter() ⽅法中循环调⽤了 supports() ⽅法判断是否兼容,循环迭代集合中的 “Adapter” 在初始化时已经赋值。